Call us 24/7+86 15396210640
Welcome to the official website of Lingkong Automation Technology Co., Ltd!
Call us 24/7+86 15396210640

Temaline Wiegand ModuleDigital Wiegand Multi I/O Management Device

Digital Wiegand Multi I/O

Management Device

The TK_S014 Wiegand module enables connectivity of any standard 

device which uses the industry standard wiegand protocol, including 

biometrics. 

Also enables step-by-step migration of current installations to save time 

and move to new Temaline access control technologies and benefits.

MAJOR BENEFITS

Easy to install:

The direct LON connection and embedded I/O simplifies installation and 

engineering and reduces the number of system devices.

Flexibility: 

Select the reader you prefer in terms of design or re-use existing devices 

for cost-saving purposes.

Investment protection: 

As your network grows, the solution can scale and devices can be re-used.

l Standard DIN/

Omega RAIL 35

l TK_S014 supports 

Two “Wiegand 7 

Wire” connected 

card readers and 

the I/O associated 

with a single door.

l Echelon “LON” 

Device

l Tamper-proof 

housing

l Internal I/O for 

door control

l Supervised inputs

l RoHS compliant, 

so environment 

respectful

PHYSICAL SPECIFICATION

Protection Rating IP31

Dimensions (H x W x D) 90mm x 105mm x 70mm

Weight 0.2kg

ENVIRONMENTAL

Operating Temperature Standard DIN/omega Rail 35

Operating Humidity 0°

C / +50°

C

Certification

Directive EMC 89/336/EEC, 92/31/EEC

Low Voltage Directive 93/68/EEC

RoHS/WEEE compliant device

Directives 2002/95/EC 2002/96/EC

TCC-80Port-powered RS-232 to RS-422/485 converter

› External power source supported but not required 

› Compact size 

› Converts RS-422, and both 2-wire and 4-wire RS-485

› RS-485 automatic data direction control 

› Automatic baudrate detection 

› 15 KV serial ESD protection

› Built-in 120-ohm termination resistors

The TCC-80 provides complete signal conversion between RS-232 and 

RS-422/485, without requiring an external power source. It supports 

both half duplex 2-wire RS-485 and full duplex 4-wire RS-422/485, 

either of which can be converted between RS-232’s TxD and RxD lines. 

In addition, the TCC-80’s 15 KV ESD protection guards against damage 

from electrostatic discharge.

Automatic data direction control is also provided for RS-485, in 

which the RS-485 driver is enabled automatically when the circuitry 

senses the TxD output from the RS-232 signal. This means that no 

programming effort is required to control the transmission direction of 

the RS-485 signal.

The RS-232 port of the TCC-80 is a DB9 female socket that can 

connect directly to the host PC, with power drawn from the TxD, 

RTS, or DTR line. Regardless of whether the signal is high or low, 

the TCC-80 can obtain enough power from the data/handshake line. 

However, external power can be used if the handshake line is not 

available, if the serial cable is too long, or if the RS-232 device is a low 

power device. For external power, a 5 to 12 VDC power supply can be 

connected using an adaptor or a USB power cord

When installing a TCC-80 converter, it is important to pay attention 

to power consumption, RS-232 cable length, and RS-422/485 

transmission distance. In general, the TCC-80 obtains 50 mW from 

the power source. Standard PC COM ports can provide 70 to 90 mW 

of power if the TxD, RTS, and DTR lines are connected. Moreover, 

Port Power Dissipation

the RS-232 cable should be shorter than 15 m (@ 9600 bps) to 

ensure that less power is lost from the host/device to the TCC-80. 

The remainder of the supplied power is used for transmitting the 

RS-422/485 signal.

Specifications

PIN RS-232

1 DCD

2 TxD

3 RxD

4 DSR

5 GND

6 DTR

7 CTS

8 RTS

DB9 female

connector

DIP Switch Settings

5 4 3 2 1

9 8 7 6

RS-232 Side

Connector: DB9 female

Signals:

RS-232: TxD, RxD, RTS, CTS, DTR, DSR, DCD, GND

(Loop-back wiring: RTS to CTS, DTR to DSR and DCD)

RS-422/485 Side

Connector: Terminal Block or DB9 male

Signals (interface selected by DIP switch):

RS-422: TxD+, TxD-, RxD+, RxD-, GND

RS-485-4w: TxD+, TxD-, RxD+, RxD-, GND

RS-485-2w Signals: Data+, Data-, GND

RS-485 Data Direction Control: ADDC® (automatic data direction 

control)

Serial Transmission

Baudrate: 300 bps to 115.2 Kbps

ESD Protection: 15 KV

Pull High Resistance: 1k ohm

Pull Low Resistance: 150k ohm

Physical Characteristics

Case: ABS + PC

Weight: 50 ± 5 g

Dimensions: 42 x 80 x 22 mm (1.65 x 3.15 x 0.87 in)

Environmental Limits

Operating Temperature: 0 to 60°C (32 to 140°F)

Operating Humidity: 5 to 95% RH

Storage Temperature: -20 to 75°C (-14 to 167°F)

Power Requirements

Source of Input Power: RS-232 port (TxD, RTS, DTR) or power input 

jack

Input Voltage: 5 to 12 VDC

Power Consumption: 10 mA @ 5 V (with termination disabled)

Surge Protection: Embedded 15 KV ESD Surge Protection

Regulatory Approvals

CE: Class B

FCC: Class B

Warranty

Warranty Period: 5 years

Details: See www.moxa.com/warranty

Ordering Information

Optional Accessories (can be purchased separately)

Package Checklist

• TCC-80 media converter

• USB power cord (50 cm)

• Quick Installation Guide (printed)

• Warranty Card

Available Models

TCC-80: Port-powered RS-232 to RS-422/485 converter with 15 KV serial ESD protection and 

terminal block on the RS-422/485 side

TCC-80-DB9: Port-powered RS-232 to RS-422/485 converter with 15 KV serial ESD protection 

and DB9 male connector on the RS-422/485 side

Power Adaptor

CBL-F9M9-20: DB9 male to DB9 female RS-232 cable (20 cm)

Unicom-JETNETJetNet 4510 Industrial 10-port Management Fast Ethernet Switch

7 10/100 Base TX and 3 RJ-45/SFP combo (10/100BaseTX, 100Base-FX )

Flexible Fiber connection-Multi or Single mode fiber 

cable

Comprehensive Ring Technology- Multiple Super Ring 

(MSRTM)

Latest Rapid Super Ring Technology- 5 ms failover time, 

zero for restore time

Multi-path, Multi-node backup technology-Rapid Dual 

Homing (RDHTM )

Multiple ring coupling technology- MultiRingTM

Ring Path Aggregation technology – TrunkRingTM

Flexible Ring architecture- TangentRingTM,CrossRingTM

, AnyRingTM

Support device recovery utility – JetViewTM

High Speed Fabric-32Gbps with Non-blocking technology 

LACP /VLAN / GVRP /QoS /IGMP Snooping/Rate 

Control/ Online Multi-Port Mirroring

Secured by Port, Access IP, SSH and HTTPS Login

IEEE 802.1x with Local and remote authenticate service.

(YHQW1RWL¿FDWLRQE60736103WUDSDQGVVWHPORJV

Cisco-Like CLI, Web, SNMP/RMON for network 

Management

Redundant DC Power Inputs, Digital Input and Relay 

Output

1.5KV Hi-Pot Protection for ports and power

,QGXVWULDO+HDW GLVSHUVLQJ GHVLJQ aÛ& RSHUDWLQJ

temperature, Rigid Aluminum Case Complies with IP31

The JetNet 4510 is a Managed industrial Ethernet 

Switch, equipped with 7 ports 10/100TX and 3 

ports 10/100 RJ-45 / 100FX SFP combo ports. 

The JetNet 4510 is designed as rugged surface in 

aluminum alloy material and with wide operating 

temperature. The software supports full L2

management features, ring redundancy, network 

Overview

control, security and alert features. The JetNet 

4510 also supports RS-232 console for out of band 

management and the combo port design could 

enlarged connection from 10 ports pure 10/100Mbps

pure copper to 7 ports 10/100Mbps copper plus 3 

¿EHUSRUWVZLWKPXOWLPRGHRUVLQJOHPRGHWUDQVFHLYHU

in random.

It is critical for industrial applications that network 

remains non-stop. Korenix Rapid Super Ring 

technology provides network redundancy that can 

self-recover in less than 5 ms at full load. Besides, 

JetNet 4510 provides users with many advanced 

management features. It can be configured smartly 

by console CLI and web browser, the network 

DGPLQLVWUDWRUFDQGH¿QHHYHQWQRWL¿FDWLRQWREHVHQW

via E-mail, SNMP trap, Syslog or relay output. Online 

status of each port is also shown on web page. To 

optimize network traffic, network administrators 

can segment ports into different VLANs, or filter 

S

multicast traffic by IGMP Snooping. Bandwidth 

can be managed by port rate control to avoid 

abnormalbroadcast storm. To enhance security, 

port access can be limited to pre-defined IP 

address table, binding MAC address to specific 

port or managed by HTTPS or SSH or perform 

access security through IEEE 802.1x mechanism. 

Network determinism is answered by QoS, Quality 

of Service, for traffic prioritization. JetNet 4510

is the perfect combination for intelligent network 

management and robust network operation.

The JetNet 4510 equips three combo Fast Ethernet 

ports, each combo port combining one Small Form 

factor Pluggable (SFP) socket for 100Mbps multimode or single mode SFP transceiver and one RJ-45 

copper port in 10Mbps full duplex, 100Mbps half /full 

duplex link mode. The switch will automatically detect 

3 Flexible Fast Ethernet Combo Ports

the cable connections priority for combo port. Users 

can connect two 100Mbps SFP ports of JetNet 4510

as a Fast Ethernet Fiber Redundant Ring topology 

and the third combo port as a fiber uplink port or 

applicable port.

Comprehensive Redundant Solutions- Multiple Super 

Ring (MSRTM) Technology

It is critical for industrial applications that network 

remains non-stop. The JetNet 4510 supports new 

generation of ring technology – MSRTM which 

includes various new technology for different network 

redundancy applications and architectures. With the 

MSRTM technology, the failover time could be short 

less than 5 milliseconds and with zero second restore 

time. Unlimited device connective, user can enlarged 

the ring architecture as the campus need without 

delay of the data traffic. The MSRTM also facilitates 

the JetNet 4510 to connect with core management 

switch via standard Rapid Spanning Tree protocol 

though multiple paths or multiple nodes

to increase the reliability by Rapid Dual Homing 

(RDHTM) technology. To higher link availability and 

increase link capacity, the JetNet 4510 has been 

implemented IEEE 802.3ad Link Aggregation Control 

Protocol (LACP). With LACP technology, the JetNet 

4510 can negotiate an automatic port bundling 

dynamically between switches. Two or more Fast 

Ethernet connections are combined in order to 

increase the bandwidth and to create resilient and 

redundant links, it also allows two power inputs 

for power redundancy and wide DC power range, 

from DC 12V to DC 48V plus supporting DC-48V in 

industrial applications.

Rapid Super Ring (RSR) Technology

Rapid Super Ring is Korenix 2nd generation Ring 

redundancy technology. The recovery time is 

enhanced from 300ms to 5ms for copper ring, 20ms

for Fiber ring. The Ring Master can be auto-selected 

by the RSR engine. The 1st Ring Port of the R.M. is 

the primary path. The 2nd Ring Port of the R.M. is 

the block path. Once the primary path is failure, the 

2nd path will be recovered within 5ms. Besides, the 

restore time is also enhanced to zero in R.M. auto 

Rapid Dual Homing (RDHTM) Technology

In the MSR technology includes a new Dual Homing 

technology- Rapid Dual Homing (RDHTM) which 

provides flexible uplink connection in multiple node 

to node or multiple paths to one to obtain more 

HI¿FLHQFDQGUHOLDELOLWWKDQEHIRUH:KHQRXZDQW

connect multiple RSR or form the redundant topology 

with other vendors, RDHTM allows you enable RSTP 

and RSR at the same device and break the limitation 

of ring node. Thus you have more flexibility and 

standard (RSTP) way to construct your network 

topology

MultiRingTM Technology

The MultiRingTM is a new technology that construct 

coupling ring without control port and achieve 

different coupling architecture by TangentRingTM or 

CrossRingTM (Note-1) technology which provides node 

or path backup ability

By the MultiRingTM Technology, user can enlarge the 

network campus just apply different Ring ID which 

is different with neighborhood to get unlimited Ring 

Coupling ability. 

Link Aggregation Control Protocol, TrunkRingTM

Technology

Link Aggregation Control Protocol allows you to group 

multiple Ethernet ports in parallel to increase the link 

bandwidth. The aggregated ports can be viewed as 

one physical port, so that the bandwidth is higher 

than just one single Ethernet port. The member ports 

of the same trunk group can balance the loading 

and backup with each other. The LACP feature is 

usually used when you need higher bandwidth for the 

backbone network. This is an inexpensive way for 

you to transfer much more data. If the trunk port 

also assigned as a ring port then it will become as 

a TrunkRingTM – which mean is the bandwidth of 

ring path have increased by port trunk technology 

and there is no recovery time when failure occurred. 

The JetNet 4510 provides a simply, easily way to 

aggregate port bandwidth into Rapid Super Ring.

Robust Mechanism Design

Korenix JetNet 4510 outstanding outlook is attractive 

and with strong functionality. The special fan-less 

mechanical design adapts the thermodynamic 

technique to ventilate heat generated from Fast 

(WKHUQHWPRGXODUHI¿FLHQWO7KHIRUPIDFWRUZLWKQLFH

LQZDUGFXUYDWXUHRQWKHVLGHVGULYLQJDLUÀRZWKURXJK

the enclosure, it helps carrying the rising heat 

toward the top ventilation holes to let the chimneyHIIHFWÀRZVEHFRPHYHUHIIHFWLYH8VLQJDOXPLQXP

extrusion case with industrial arts quality, IP 31 class 

of protection, light weight, rigid assembly, excellent 

thermal conductivity, fin-type by extending heat 

dissipation surface assures units can be operated 

under harsh industrial environment reliably

Technology

Standard:

IEEE 802.3 10Base-T Ethernet

IEEE 802.3u 100Base-TX Fast Ethernet

IEEE 802.3u 100Base-FX Fast Ethernet

IEEE 802.3x Flow Control and Back-pressure

IEEE 802.1p class of service

IEEE 802.1Q VLAN

IEEE 802.1D-2004 Rapid Spanning Tree Protocol (RSTP)

IEEE 802.3ad LACP

IEEE 802.1x Port based Network Access Control

Performance

Switch Technology:

Store and Forward Technology with 32Gbps Switch Fabric

System Throughput: 2.976Mpps/ 64bytes packet length

Transfer packet size: 

64 bytes to 1522 bytes (with VLAN Tag)

Transfer performance: 14,880pps for Ethernet and 

148,800pps for Fast Ethernet

MAC Address: 8K MAC

Packet Buffer: 1Mbits

Relay Alarm: 

Dry Relay output with 1A@DC 24V contact ability

Management

&RQ¿JXUDWLRQCisco-Like CLI, Telnet, Web, TFTP/

:HE8SGDWHIRU¿UPZDUHDQGFRQ¿JXUDWLRQEDFNXSDQG

restore, DHCP Client, warm reboot, reset to default, Admin 

password, Port Speed/Duplex Control, status, statistic, MAC 

address table display, static MAC, Aging time, SNMP v1,

v2c, v3, Traps and RMON1

SNMP MIB: MIBII, Bridge MIB, VLAN MIB, SNMP MIB, 

RMON and Private MIB

Port Trunk: Up to 5 Static Trunk and with IEEE 802.3ad

LACP protocol

VLAN: 802.1Q VLAN, GVRP. Up to 64 VLAN groups

Port Trunk: Up to 5 Static Trunk and 802.3ad LACP 

Quality of Service: Four priority queues per port, 802.1p

COS and Layer 3 TOS/DiffServ

IGMP Snooping: IGMP Snooping V1/V2 /V3 for multicast 

¿OWHULQJDQG,*034XHU99

Rate Control:,QJUHVV¿OWHULQJIRU%URDGFDVW0XOWLFDVW

8QNQRZQ’$RUDOOSDFNHWVDQG(JUHVV¿OWHULQJIRUDOO

packets

NTP: Network Time Protocol to synchronize time from 

internet or local PC

Embedded Watchdog: Embedded hardware watchdog 

timer to auto reset system when failure

Port Mirroring: 2QOLQHWUDI¿FPRQLWRULQJRQPXOWLSOH

selected ports

Port Security: Port security to assign authorized MAC to 

VSHFL¿FSRUW

IP Security: IP address security to prevent unauthorized 

access

E-mail Warning: $XWRPDWLFHPDLOZDUQLQJESUHGH¿QHG

events

System Log: Supports both Local mode and Server mode

DHCP: DHCP Client, DHCP Server with IP binding MAC or 

excludes IP address functions

Port Based Network Security: IEEE 802.1x for user 

access authentication with local access list or remote 

Radius server

Network Redundancy

Rapid Spanning Tree: IEEE802.1D-2004 Rapid Spanning 

Tree Protocol. Compatible with Legacy Spanning Tree and 

802.1w

Multiple Super Ring(MSRTM): New generation Korenix 

Ring Redundancy Technology-Multiple Super Ring.

The MSRTM supports 5ms failover time and zero delay 

of restore time with R.M. auto selection, it also backward 

compatible with legacy super ring in slave mode

Rapid Dual Homing (RDHTM): Support multiple node to 

QRGHPXOWLSOHSDWKWRRQHQRGHWRREWDLQPRUHÀH[LEOHDQG

reliable architecture

TrunkRingTM: Provides port aggregate function in ring 

path to get more bandwidth for higher throughput ring 

architecture

MultipleRingTM: New generation of ring coupling technology 

without extra control port. It equipped 2 types of connection 

architecture- TangentRingTM and CrossRingTM (Note-1)

Any Ring: Inter-operate with other venders’ redundant ring

Interface

Number of Ports: 

10/100TX: 7 x RJ-45, Auto MDI/MDI-X, Auto Negotiation

10/100TX: 3 x RJ-45, combo with SFP

100Base-FX: 3 x SFP with Hot- Swappable

Cables:

10Base-T: 2-pair UTP/STP Cat. 3, 4, 5 cable, EIA/TIA-568B

100-ohm (100m)

100 Base-TX: 2/4-pair UTP/STP Cat. 5 cable, EIA/TIA-568B

100-ohm (100m)

Diagnostic LED:

10/100 RJ-45: Link /Activity(Green), Full duplex/Collision 

(Yellow)

Port 8~10 Copper: Link/Activity(Green)

Port 8~10 SPF: Link/Activity(Green)

Unit: Power(Green), Digital Out(Red), Digital Input(Green), 

R.M.(Green)

RS232 Console: RJ-45 Connector, Pin3: TxD, Pin6: RxD, 

Pin5:GND

Power: 2 sets of power Input

Digital Input: 

2 sets of Digital Input

Logic Low (0): DC 0~10V

Logic High(1): DC 11~30V

Alarm: VHWVRI5HODRXWSXWIRUSUHGH¿QHGHYHQWV

Reset: Reset button is provided to restore default settings

Power Requirements

System Power: Dual Power Input, DC 12~48V/-12~-48V 

with Reverse Polarity Protection

Power Consumption: About 11.5 Watts @ DC 48V

Mechanical

Installation: DIN-Rail mount or Wall Mount

Case: IP-31 protection, aluminum metal case

Dimension: 137mm(H) x 96mm (W) x 119mm (D) 

( without DIN rail clip)

Weight: 0.915 g without package

Environmental

Operating Temperature: -10 ~70O

C

Operating Humidity: 5% ~ 95% (non-condensing)

Storage Temperature: -40 ~ 85O

C

Hi-Pot: 1.5KV for ports and power

Regulatory Approvals

EMI: FCC Class A, CE/EN55022. Class A

EMC Immunity Interface: EN61000-4-2, EN61000-4-3, 

EN61000-4-4, EN61000-4-5, EN61000-4-6, EN61000-4-8, 

EN61000-4-11

Safety: UL, cUL

Shock: IEC60068-2-27

Vibration: IEC60068-2-6

Free Fall: IEC60068-2-32

MTBF: 249,683 Hours ,*MIL-HDBK-217F GB(MILITARY 

HANDBOOK) standard

Warranty: 5 years

Note-1: Available in the further, please contact with Korenix 

sales windows for more detail information

Ordering Information

JetNet 4510 Industrial 10-Port Managed Fast Ethernet Switch

Includes:

7-ports 10/100Base-TX and 3 10/100/ 100FX SFP Combo ports Switch

Wall mounting plate and six screws

Quick Installation Guide

Documentation CD-ROM

Ordering Accessories

JetNet 4510 Industrial 10-Port Managed Fast Ethernet Switch

Includes:

7-ports 10/100Base-TX and 3 10/100/ 100FX SFP Combo ports Switch

Wall mounting plate and six screws

Quick Installation Guide

Documentation CD-ROM

SFP100MM: 100Mbps SFP Transceiver,1310nm, multi-mode, 2KM, -10~70O

C

SFP100MM-w: 100Mbps SFP Transceiver,1310nm, multi-mode, 2KM, -40~85O

C

SFP100SM30: 100Mbps SFP Transceiver,1310nm, single-mode, 30KM, -10~70O

C

SFP100SM30-w: 100Mbps SFP Transceiver,1310nm,single-mode, 30KM, -40~85O

C

General Specifications FCN Autonomous Controller Hardware (FCN-500)

 GENERAL

This document describes the general specifications 

of the FCN autonomous controller with NFCP501/

NFCP502 CPU module. (FCN is an acronym for field 

control node.)

Notation in this document:

• The term “FCN” refers to the module consisting type 

autonomous controllers.

• The term “FCN-500” refers to the autonomous 

controllers with NFCP501/NFCP502 CPU module.

For Function, refer to FCN Autonomous Controller 

Functions (FCN-500), GS 34P02Q03-01E.

FCN Autonomous Controller 

Hardware (FCN-500)

Yokogawa Electric Corporation

2-9-32, Nakacho, Musashino-shi, Tokyo, 180-8750 Japan

GS 34P02Q14-01E

GS 34P02Q14-01E

©Copyright Mar. 2016(YK)

20th Edition Apr. 1, 2022(YK) 

 FEATURES

• High-performance, high-reliability modular controller

• Memory with ECC

• Low heat dissipation eliminates the need for a fan

• A wealth of RAS features — CPU self-diagnostics, temperature monitoring, I/O diagnostics, and more

• The CPU, power supply module, internal communication bus on backboard (SB bus), E2 bus (extension bus), and 

control network (Ethernet port 1 and 2) can all be duplexed, and all modules are hot-swappable. Use a couple of the 

CPU module of the same type to make the CPU module duplex configuration.

• Can function as link active schedulers (LASs) for low-speed voltage mode (H1) FOUNDATION Fieldbus segments, 

and link up FOUNDATION Fieldbus-enabled field devices. 

CONFIGURATION

An FCN-500 consists of the following: 

• Base module

• Power supply module

• CPU module

• E2 bus interface module (extending the unit) (*1)

• SB bus repeat module (extending the SB bus to connect an extension unit) (*1)

• I/O modules

*1: SB bus repeat module and E2 bus interface module can not be used together.

There are four types of base module.

– NFBU200 base module (long): Control unit and extension unit sharing, 

 duplexed power supply possibility

– N2BU051 base module (short): Control unit and extension unit sharing

– NFBU050 base module (short): Control unit only, for low power

– N2BU030 base module (compact): Control unit and extension unit sharing

l Control unit alone

The control unit is unit with CPU module. The maximum number of I/O modules that can be implemented depends on 

the type of base module and the number of CPUs.

Maximum I/O Module Configurations

Base Module Unit Configuration Standard Duplexed (*1)

NFBU200 base module (long) Control unit alone Max. 8 modules Max. 6 modules

N2BU051 base module (short) Control unit alone Max. 3 modules Not applicable (*2)

NFBU050 base module (short) Control unit alone Max. 3 modules Not applicable (*2)

N2BU030 base module (compact) Control unit alone Max. 1 module Not applicable (*2)

*1: When CPU modules are duplexed

*2: Neither power supply nor CPU modules can be duplexed on N2BU051, NFBU050 or N2BU030

Example: Standard control unit

Example: Control unit with duplexed CPU and power supply modules

Example: Short control unit

Example: Compact control unit

l Unit extension with E2 bus

Up to eight extension units can be connected to the control unit using the E2 bus interface modules. Two ports of 

the E2 bus interface module mounted on the control unit can be connected to extension units as separate lines. The 

maximum number of extendable units that can be connected is a maximum of 8 units in total of two lines. Three types 

of base modules (NFBU200, N2BU051 or N2BU030) can be used as control unit and extension unit. By installing two 

E2 bus interface modules in each base module, it is possible to duplex E2 bus. (*1)

Connect each E2 bus interface module with UTP straight cable (CAT 5e or higher). The distance between units can be 

extended up to 100 m.

*1: When using the compact base module for the control unit, it is not possible to duplex the communication lines.

Maximum I/O Module Configurations

Note: NFCP501/NFCP502 CPU module style S2 or later is required to use the E2 bus interface module.

*1: When CPU and E2 bus interface modules are duplexed.

*2: When NFBU200 base modules are used in all extension units.

Extension of Transmission distance by Optical fiber

The transmission distance between units can be extended by converting the system from UTP straight cable to 

fiber optic cable with third party’s media converters. Only Layer 1 (Physical Layer) media converters which simply 

convert packets from electric signal to optical signal can be used for the E2 bus. Refer to the verified media converter 

information and precaution on Yokogawa Partner Portal STARDOM site when choosing the model.

Example: Standard control unit + 8 extension units with E2 bus interface modules / 1 lines

Example: Control unit with duplexed CPU modules, power supply modules, and E2 bus + 8 extension units 

/ 1 lines

Example: Control unit with duplexed CPU modules, power supply modules, and E2 bus + 8 extension units 

/ 2 lines

Note: The CPU module, power supply module, and E2 bus can be made duplex individually, when required

Example: Mixed base module configuration, E2 bus + 8 extension units / 2 lines

Note: Three kinds of base modules (NFBU200, N2BU051 or N2BU030) can be arranged according to the number of I/O points 

and installation environment required for the control unit and extension unit. 

schneiderIGP10, IGP20 Intelligent Gauge Pressure Transmitters IAP10 Intelligent Absolute Pressure Transmitter

• IGP10 for compact light weight and direct-to-process

mounting (bracket optionally available)

• IGP20, bracket mounted, for lower ranges, more

material options, and vacuum service

• Field-proven silicon strain gauge technology

• Corrosion-resistant epoxy finish

• Accuracy to ± 0.07 % of span

• Ambient temperature effects to ± 0.2 % URL

per 55 °C (100 °F) change

• Intelligent FOXCOM & HART / 4 to 20 mA version

or economical 4 to 20 mA version

• LCD Indicator / Pushbutton Configurator

to set zero, span, display units, etc.

Optional on Digital / 4 to 20 mA version,

Standard on 4 to 20 mA version

These Intelligent, two-wire transmitters provide precise, reliable, measurement of gauge or absolute

pressure, and transmit a 4 to 20 mA output signal

with a superimposed HART/ FOXCOM digital signal for remote configuration and monitoring.

IGP10 Span, Range and Overrange Limits

IAP10 Span, Range and Overrange Limits

Span

Limits

Code

Span Limits Range Limits Maximum Overrange

kPa psi bar

(kg/cm²) kPa psi bar

(kg/cm²) kPa psi bar

(kg/cm²)

C 7 & 210 1 & 30 0.07 & 2.1 0 & 210 0 & 30 0 & 2.1 310 45 3.15

D 70 & 2100 10 & 300 0.7 & 21 0 & 2100 0 & 300 0 & 21 3100 450 31.5

E 700 & 21000 100 & 3000 7 & 210 0 & 21000 0 & 3000 0 & 210 31000 4500 315

IGP20 Span, Range and Overrange Limits

Span

Limits

Code

Span Limits Range Limits Maximum Overrange

kPa psi bar

(kg/cm²) kPa psi bar

(kg/cm²) kPa psi bar

(kg/cm²)

B 0.87 & 50 0.125 & 7 0.0087 & 0.5 –50 & 50 –7 & 7 –0.5 & 0.5 25000 3625 250

C 7 & 210 1 & 30 0.07 & 2.1 –100 & 210 –14.7 & 30 –1 & 2.1 25000 3625 250

D 70 & 2100 10 & 300 0.7 & 21 –100 & 2100 –14.7 & 300 –1 & 21 25000 3625 250

E 700 & 21000 100 & 3000 7 & 210 –100 & 21000 –14.7 & 3000 –1 & 210 25000 3625 250

Temperature Limits

Fill fluid

Flourinert

Fill fluid

Silicone

Ambient: –29 to 85 °C

(–20 to 185 °F)

–40 to 85 °C

(–40 to 185 °F)

Sensor: –29 to 121 °C

(–20 to 250 °F)

–46 to 121 °C

(–50 to 250 °F)

Gauge, Abs. and d/p Pressure

Accuracy (Includes Linearity, Hystersis, and

Repeatability)

Electronics

Version

Configured

Output Signal

Accuracy in %

of Calib. Span

-D & -T Digital

4 to 20 mA

± 0.07

± 0.1

-I 4 to 20 mA ± 0.2

Ambient Temperature Effect

Total effect for a 55 °C (100 °F) change within Normal Operating Conditions limit is:

Electronics -D, -T: ± 0.2 % of URL

Electronics -I: ± (0.2 % of URL + 0.1 % of span)

For complete specifications, refer to Product Specification

Sheet PSS 2A-1C13 B

Model Codes IGP10

Ambient Temperature Effect

Total effect for a 55 °C (100 °F) change within Normal Operating Conditions limit is:

Electronics -D, -T: ± 0.2 % of URL

Electronics -I: ± (0.2 % of URL + 0.1 % of span)

For complete specifications, refer to Product Specification

Sheet PSS 2A-1C13 B

Gauge, Abs. and d/p Pressure IGP10 – IGP20 – IAP10

CA 2A-1C13 B-(en) 09/1999

1-2

Intelligent Direct Connected Gauge Pressure Transmitter IGP10

Electronics Versions and Output Signal

Intelligent; Digital FoxCom and/or 4 to 20 mA dc, Configurable . . . . . . . . . . . . . . -D

Intelligent; Digital HART and 4 to 20 mA . . . . . . . . . . . . . . . . . . . . . . . . . -T

4 to 20 mA Analog Output, Explosionproof and Intrinsically Safe . . . . . . . . . . . . . -I

Structure Code – Process Connection, Sensor, and Fill Fluid

Process Connection Mat’l Sensor Fill Fluid

316L ss Co-Ni-Cr Silicone. . . . . . . . . . . . . . . . . . . . . . . . 20

316L ss Co-Ni-Cr Fluorinert . . . . . . . . . . . . . . . . . . . . . . . 21

316L ss 316L ss Silicone . . . . . . . . . . . . . . . . . . . . . . . 22

316L ss 316L ss Fluorinert. . . . . . . . . . . . . . . . . . . . . . . 23

Span Limits – Absolute or Gauge Pressure Units, as Applicable

MPa psi bar or kg/cm²

0.007 and 0.21 1 and 30 0.07 and 2.1…………………………C

0.07 and 2.1 10 and 300 0.7 and 21 …………………………D

0.7 and 21 100 and 3000 7 and 210 ………………………..E

Conduit Connection

1/2 NPT Conduit Connection, Both Sides ……………………………..1

PG 13.5 Conduit Connection, Both Sides (available only with Electrical Safety CodesE&N ………2

Electrical Safety (See Electrical Safety Specifications Section)

CENELEC Certified Intrinsically Safe, ia ………………………………..E

CSA Certified …………………………………………….N

EUROPEAN Ex, N, IIC. Nonsparking ………………………………….C

FM Approved …………………………………………….F

SAA Certified, EEx, d, IIC ……………………………………….A

Options

Mounting Bracket Set

Painted Steel Bracket with Plated Steel Bolts . . . . . . . . . . . . . . . . . . . . . . . . . . . . . . . . . . . . . . . M1

Stainless Steel Bracket with Stainless Steel Bolts . . . . . . . . . . . . . . . . . . . . . . . . . . . . . . . . . . . . . M2

Digital Indicator with Pushbuttons (standard equipment on IGP10-I)

Digital Indicator, Pushbuttons, and Window Cover (for Electr VersionD&T only) . . . . . . . . . . . . . . . . . . . . . -L1

Vent Screw and Block & Bleed Valve

Vent Screw in Process Connection for IGP10/IAP10; or in High Side Process Cover for IGP20. . . . . . . . . . . . . . . V1

Block and Bleed Valve, Carbon Steel . . . . . . . . . . . . . . . . . . . . . . . . . . . . . . . . . . . . . . . . . . . V2

Block and Bleed Valve, 316 ss. . . . . . . . . . . . . . . . . . . . . . . . . . . . . . . . . . . . . . . . . . . . . . . V3

Block and Bleed Valve, 316 ss Body w/Monel Trim (NACE Approved) . . . . . . . . . . . . . . . . . . . . . . . . . . . V4

Conduit Thread Adapters

Hawke-Type 1/2 NPT Cable Gland for use with Conduit Connection Code “1” . . . . . . . . . . . . . . . . . . . . . . . A1

Plastic PG 13.5 Connector for use with Conduit Connection Code “2” (available only with Electrical Safety Codes E & N) . A2

M20 Connector for use with Conduit Connection Code “1” . . . . . . . . . . . . . . . . . . . . . . . . . . . . . . . . . A3

Electronics Housing Features

External Zero Adjustment . . . . . . . . . . . . . . . . . . . . . . . . . . . . . . . . . . . . . . . . . . . . . . . . . Z1

Custody Transfer Lock and Seal . . . . . . . . . . . . . . . . . . . . . . . . . . . . . . . . . . . . . . . . . . . . . . Z2

External Zero Adjustment and Custody Transfer Lock and Seal . . . . . . . . . . . . . . . . . . . . . . . . . . . . . . Z3

Factory Configuration

Digital Output (4 to 20 mA Default if not selected) . . . . . . . . . . . . . . . . . . . . . . . . . . . . . . . . . . . . . C1

Full Factory Configuration (Requires Configuration Form to be filled out) . . . . . . . . . . . . . . . . . . . . . . . . . . C2

Miscellaneous Optional Selections

G 1/2 B Manometer Process Connection (Not Available with Option “-V1”) …………………….G

R 1/2 Process Connection (1/2 NPT to R 1/2 Adapter) ……………………………..R

Five Year Warranty …………………………………………….W

Supplemental Customer Tag (Stainless Steel Tag wired onto Transmitter)

Options (continued)

Conduit Thread Adapters

Hawke-Type 1/2 NPT Cable Gland (for use with 1/2 NPT Conduit Connection Code 1) . . . . . . . . . . . . . . . . . . A1

Plastic PG 13.5 Connector (for use with PG 13.5 Conduit Connection Code 2)

(available only with Electrical Safety Codes E & N). . . . . . . . . . . . . . . . . . . . . . . . . . . . . . . . . . . . . A2

M20 Connector (for use with 1/2 NPT Conduit Connection Code 1) . . . . . . . . . . . . . . . . . . . . . . . . . . . . A3

Electronics Housing Features

External Zero Adjustment . . . . . . . . . . . . . . . . . . . . . . . . . . . . . . . . . . . . . . . . . . . . . . . . . Z1

Custody Transfer Lock and Seal . . . . . . . . . . . . . . . . . . . . . . . . . . . . . . . . . . . . . . . . . . . . . . Z2

External Zero Adjustment and Custody Transfer Lock and Seal . . . . . . . . . . . . . . . . . . . . . . . . . . . . . . Z3

Factory Configuration

Digital Output (4 to 20 mA Default if not selected) (Electr. Version D only) . . . . . . . . . . . . . . . . . . . . . . . . . C1

Full Factory Configuration (Requires Configuration Form) . . . . . . . . . . . . . . . . . . . . . . . . . . . . . . . . . C2

Ermeto Connectors

Steel, Connecting 6 mm Tubing to 1/4 NPT Process Connector . . . . . . . . . . . . . . . . . . . . . . . . . . . . . . E1

Steel, Connecting 12 mm Tubing to 1/2 NPT Process Connector . . . . . . . . . . . . . . . . . . . . . . . . . . . . . E2

316 ss, Connecting 6 mm Tubing to 1/4 NPT Process Connector . . . . . . . . . . . . . . . . . . . . . . . . . . . . . E3

316 ss, Connecting 12 mm Tubing to 1/2 NPT Process Connector. . . . . . . . . . . . . . . . . . . . . . . . . . . . . E4

Miscellaneous Optional Selections

Vent Screw In Side of Process Cover……………………………………..V

Five Year Warranty …………………………………………….W

Supplemental Customer Tag …………………………………………T

(a) Refer to PSS 2A-1Z9 E for option descriptions, and for additional optional features and accessories not listed in Model Code.

(b) See Functional Specifications section for pressure deratings when certain DIN 19213 versions are specified.

(c) Temperature limits derated to 0 and 60°C (32 and 140°F).

(d) Mounting Set option is not available.

Gauge, Abs. and d/p Pressure IGP10 – IGP20 – IAP10

09/1999 CA 2A-1C13 B-(en)

1-5

Intelligent Direct Connected Absolute Pressure Transmitter IAP10

Electronics Versions and Output Signal

Digital FOXCOM or 4 to 20 mA dc, Software Selectable . . . . . . . . . . . . . . . . . -D

Digital HART and 4 to 20 mA. . . . . . . . . . . . . . . . . . . . . . . . . . . . . . . -T

4 to 20 mA Analog Output . . . . . . . . . . . . . . . . . . . . . . . . . . . . . . . . -I

Structure Code – Process Connection, Sensor, and Fill Fluid

Process Connection Mat’l Sensor Fill Fluid

316L ss Co-Ni-Cr Silicone. . Val. Pkg. . . . . . . . . . . . . . . . . . 20

316L ss Co-Ni-Cr Fluorinert . . . . . . . . . . . . . . . . . . . . . . . 21

316L ss 316L ss Silicone . . . . . . . . . . . . . . . . . . . . . . . 22

316L ss 316L ss Fluorinert. . . . . . . . . . . . . . . . . . . . . . . 23

Span Limits – Absolute or Gauge Pressure Units, as Applicable

MPa psi bar or kg/cm²

0.007 and 0.21 1 and 30 0.07 and 2.1…………………………C

0.07 and 2.1 10 and 300 0.7 and 21 …………………………D

0.7 and 21 100 and 3000 7 and 210 ………………………..E

Conduit Connection

1/2 NPT Conduit Connection, Both Sides ……………………………..1

PG 13.5 Conduit Connection, Both Sides (available only with Electrical Safety CodesE&N ………2

Electrical Safety (See Electrical Safety Specifications Section)

CENELEC Certified Intrinsically Safe, ia ………………………………..E

CSA Certified …………………………………………….C

EUROPEAN Ex, N, IIC. Nonsparking ………………………………….N

FM Approved …………………………………………….F

SAA Certified, EEx, d, IIC ……………………………………….A

Options

Mounting Bracket Set

Painted Steel Bracket with Plated Steel Bolts . . . . . . . . . . . . . . . . . . . . . . . . . . . . . . . . . . . . . . . M1

Stainless Steel Bracket with 316 ss Bolts . . . . . . . . . . . . . . . . . . . . . . . . . . . . . . . . . . . . . . . . . M2

Indicator with Pushbuttons (standard equipment on IGP10-I)

Digital Indicator, Pushbuttons, and Window Cover (for Electr VersionD&T only) . . . . . . . . . . . . . . . . . . . . . -L1

Vent Screw and Block & Bleed Valve

Vent Screw in Process Connection for IGP10/IAP10; or in High Side Process Cover for IGP20. . . . . . . . . . . . . . . V1

Block and Bleed Valve, Carbon Steel . . . . . . . . . . . . . . . . . . . . . . . . . . . . . . . . . . . . . . . . . . . V2

Block and Bleed Valve, 316 ss. . . . . . . . . . . . . . . . . . . . . . . . . . . . . . . . . . . . . . . . . . . . . . . V3

Block and Bleed Valve, 316 ss Body w/Monel Trim (NACE Approved) . . . . . . . . . . . . . . . . . . . . . . . . . . . V4

Conduit Thread Adapters

Hawke-Type 1/2 NPT Cable Gland for use with Conduit Connection Code “1” . . . . . . . . . . . . . . . . . . . . . . . A1

Plastic PG 13.5 Connector for use with Conduit Connection Code “2” (available only with Electrical Safety Codes E & N) . A2

M20 Connector for use with Conduit Connection Code “1” . . . . . . . . . . . . . . . . . . . . . . . . . . . . . . . . . A3

Electronics Housing Features

External Zero Adjustment . . . . . . . . . . . . . . . . . . . . . . . . . . . . . . . . . . . . . . . . . . . . . . . . . Z1

Custody Transfer Lock and Seal . . . . . . . . . . . . . . . . . . . . . . . . . . . . . . . . . . . . . . . . . . . . . . Z2

External Zero Adjustment and Custody Transfer Lock and Seal . . . . . . . . . . . . . . . . . . . . . . . . . . . . . . Z3

Factory Configuration

Digital Output (4 to 20 mA Default if not selected) . . . . . . . . . . . . . . . . . . . . . . . . . . . . . . . . . . . . . C1

Full Factory Configuration (Requires Configuration Form to be filled out) . . . . . . . . . . . . . . . . . . . . . . . . . . C2

Miscellaneous Optional Selections

G 1/2 B Manometer Process Connection (Not Available with Option “-V1”) …………………….G

R 1/2 Process Connection (1/2 NPT to R 1/2 Adapter) ……………………………..R

Five Year Warranty …………………………………………….W

Supplemental Customer Tag (Stainless Steel Tag wired onto Transmitter) ..

schneiderInstruction MI 021-390 February 2016 I/A Series® Magnetic Flow Transmitter Model IMT25 Operation, Configuration, and Calibration

1. Introduction

Description

An I/A Series Magnetic Flowmeter System consists of two major components: 

 IMT25 Magnetic Flow Transmitter with Version 2 Software

 Magnetic Flowtube

 8000A wafer body

 2800, 8300, 9100A, 9200A, or 9300A flanged body

A system may be specified with the transmitter integrally mounted with the flowtube or with a 

remote mounted transmitter, which can be mounted either on a pipe or a flat surface.

Your transmitter has one of three communication protocols.

One is a FoxCom communications protocol. The digital output signal in this version is used 

for flowmeters serving as a primary measuring device in an I/A Series system. You can 

communicate with this version via the I/A Series system, the PC-based Configurator, or the 

optional local keypad/display.

Another has HART communications capability. You can communicate with this version via a 

HART Communicator, PC-Based Configurator, or the optional local keypad/display. 

The third has FOUNDATION fieldbus communication capability. You can communicate with 

this version via a fieldbus host or the optional local keypad/display.

This document describes local operation, configuration, and calibration of an IMT25 Transmitter 

supplied with local keypad and display. For information on operation, configuration, and 

calibration from a PC-Based Configurator, a HART Communicator, or a FOUNDATION fieldbus 

host refer to the documents listed in “Reference Documents” on page 13.

Intended Audience

This document is intended for use by process operators, engineers, and instrument technicians. If 

you are interested only in operation, read the general information in the Introduction and the 

chapter titled Operation. If you are interested in calibration, read the Introduction and chapters 

titled Operation and Calibration. If you are concerned with configuration, read the entire manual, 

with special emphasis on the chapter titles Configuration and the structure diagrams in 

Appendix A and the configuration worksheets in Appendix B.

Functions

Using the IMT25 front panel keypad/display, the functions you can perform are:

Operating Functions

 Display Measurement Information: The current value of the flow rate in engineering 

units (EGU), flow rate in percent of upper range value (URV), the Forward Total, 

Reverse Total, Net Total, and Grand Total.

 Display the Status of the Transmitter: The current operating mode, Analog and Pulse 

Output values, Contact Input settings, Relay Output settings, noise reduction, 

AutoZeroLock information, and write protection as well as alarm and diagnostic 

status.

 Display Identity Information: Tag, description, and message plus identification data 

for the flowmeter, flowtube, and transmitter software.

 Acknowledge Alarms and Diagnostic Conditions.

 Reset Totals.

Calibration Functions

NOTE

These functions can be passcode protected from keypad changes.

 Adjust the 4 and 20 mA output signal (requires additional equipment)

 Preset outputs to calibrate control loop

 Calibrate the AutoZeroLock Detector

Configuration Functions

NOTE

These functions can be passcode protected from keypad changes.

 Display and modify all configuration parameters

 Assign passcodes and set levels of privilege

Reference Documents

This document addresses operation, configuration, and calibration using the local keypad/display 

panel. For remote communication with your transmitter and other details of the flowmeter, refer 

to the applicable documents listed in Table 1

2. Quick Start

FoxCom or HART Protocol

Your IMT25 Transmitter can be configured with a PC-Based Configurator or with the 

keypad/display option. With the keypad/display, two configuration menus exist, Quick Start and 

Setup. Most basic applications can be configured in Quick Start mode.

Quick Start mode can be used for applications requiring only:

 A 4-20 mA output based on a flow rate in (US) GPM

 The transmitter display to show a flow rate in (US) GPM

 A FoxCom digital or HART flow rate signal.

Use Setup mode that is fully described in “Configuration” on page 39, for applications involving:

 Transmitters powered from 50 Hz sources

 Pulse and frequency outputs

 Totalizer functions

 Flow units other than (US) GPM

 Alarm functions

 Multi-range or bi-directional flow configurations.

To make Quick Start changes to the configuration, go to 1 TOP LEVEL/Quick Start by 

pressing the Left arrow repeatedly until the display reads 1 TOP LEVEL. Then use the up/down 

arrow keys to go to 1 TOP LEVEL/Quick Start. The procedure to change your configuration is 

demonstrated by the following example: 

 Flowmeter factor of 18.22 (refer to “Determining the Meter Factor” on page 18)

 Forward direction of flow

 Flow Range 0 to 150 GPM

1. Use the Right arrow key to move to MFACTOR FORMAT? {###.######}. This format 

can be changed, if necessary, to accommodate the meter factor.

a. If no change is required, press the Right arrow key.

b. To change the format, press Shift + Change to enter Edit Mode. Then use the 

up/down arrow keys to step through the choices. When you reach the format you 

want, press the Right arrow key.

2. The display reads METER FACTOR? {###.######} (Default {012.000000}). Press 

Shift + Change to enter Edit Mode. Use the Right/Left arrow keys to move the 

cursor under the digits you want to change. Use the up/down arrow keys to change 

the digits to the desired values. In the case of this example, continue this procedure 

until the display reads [018.220000]. Use the Right arrow key to move the cursor 

out past the right bracket to save the setting. The display then reads METER FACTOR?

{018.219998}. Note that in some cases, as with this example, a slightly different

value will appear. The magnitude of this difference is insignificant. Press the Right 

arrow key again. 

NOTE

To determine the correct meter factor, refer to “Determining the Meter Factor” on 

page 18.

3. The display reads RATE FORMAT? {#####.#} This format can be changed, if 

necessary, to accommodate your flow rate.

a. If no change is required, press the Right arrow key.

b. To change the format, press Shift + Change to enter Edit Mode. Then use the 

up/down arrow keys to step through the choices. When you reach the format you 

want, press the Right arrow key.

4. The display reads FORWARD URV? {#####.#} (Default {00100.0}). Press Shift + 

Change to enter Edit Mode. Use the Right/Left arrow keys to move the cursor under 

the digits you want to change. Use the up/down arrow keys to change the digits to the 

desired values. In the case of this example, continue this procedure until the display 

reads [00150.0]. Use the Right arrow key to move the cursor out past the right 

bracket to save the setting. The display then reads FORWARD URV? {00150.0}.

5. Now that all changes have been made, press the Right arrow key. You are asked Go 

On-Line? Reply Yes by pressing the Right arrow key. Press the Right arrow key again 

to begin displaying flow measurements.

Foundation Fieldbus Protocol

Your transmitter has been preconfigured at the factory to the settings shown in Appendix B. 

Compare your needs to the factory configuration and note the changes to the configuration you 

must make.

If the transmitter is not connected to a flowtube or IMTSIM, it is necessary to put a jumper wire 

between terminals Coil 1 and Coil 2 and also to provide power to the transmitter.

This section describes the procedures to quick start the transmitter from the optional local 

keypad/display. Note that after you quick start the transmitter from the local keypad, you should 

use the fieldbus host to ensure that parameter values associated with the host are changed to agree 

with those changed from the local keypad/display. Otherwise, mismatch errors occur when you 

attempt to place the transmitter into Auto mode.

To make changes to the configuration using the local keypad/display, go to 1 TOP LEVEL/Setup

by pressing the Left arrow repeatedly until the display reads 1 TOP LEVEL. Then use the 

Up/Down arrow keys to go to 1 TOP LEVEL/Setup. The procedure to change your 

configuration is demonstrated by the following example: 

 Engineering units (EGUs) in GPM (factory default setting)

 Forward direction of flow (Unidir positive – factory default setting)

 Flow range 0 to 150 GPM

 Flowmeter factor of 18.22 (refer to “Determining the Meter Factor” on page 18)

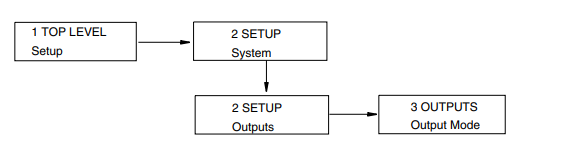
  1. Note that the factory default engineering units is already configured as GPM, so no change is required. 2. Note that the factory Output mode is also already configured as UniDir positive, so no change in the direction is required. 3. You must enter your flow upper range value however. To do this: a. Go to Setup Level 2 by pressing the Right arrow key. Next move to 2 SETUP Outputs with the Down arrow key. Then move to 3 OUTPUTS Output Mode with the Right arrow key

b. Use the Down arrow key to go to 3 OUTPUTS Range Info and the Right arrow 

key to go to FORWARD URV? {#####.#} GPM (Default {00100.0}).

c. Press the Shift + Change keys to enter Edit mode. You are asked Go Offline?

Reply Yes by pressing the Right arrow key. The display shows FORWARD URV?

[#####.#] GPM.

d. Use the Right/Left arrow keys to move the cursor under the digits you want to 

change. Use the Up/Down arrow keys to change the digits to the desired values. In 

the case of this example, continue this procedure until the display reads 

[00150.0].

e. Using the Right arrow key, move the cursor under the right bracket and press the 

key to enter the URV. The display reads FORWARD URV? {150.0} GPM. 

f. Press the key again to move back to 3 OUTPUTS Range Info.

4. Lastly, you have to enter your flowmeter factor. To do this:

a. Use the Left arrow key to move to the Level 2 menu, 2 SETUP Outputs.

b. Press the Down arrow key six times to move to 2 SETUP Calibration and the 

Right arrow key to move to the Level 3 menu, 3 CALIBRATION Meter Factor. 

See FIgure A-5.

c. Use the Right arrow key to move to MFACTOR FORMAT? {###.######}. This 

format can be changed, if necessary, to accommodate the meter factor.

d. Use the Right arrow key to move to METER FACTOR? {###.######} (Default 

{012.000000}. Then press Shift + Change to enter Edit mode.

e. Use the Right/Left arrow keys to move the cursor under the digits you want to 

change. Use the Up/Down arrow keys to change the digits to the desired values. In 

the case of this example, continue this procedure until the display reads 

[018.220000]. Use the Right arrow key to move the cursor out past the right 

bracket to save the setting. The display then reads METER FACTOR? 

{018.219998}. Note that in some cases, as with this example, a slightly different 

value appears. The magnitude of this difference is insignificant.

NOTE

To determine the correct meter factor, refer to “Determining the Meter Factor” on 

page 18.

f. Press the Right arrow key again. The display reads 3 CALIBRATION Meter 

Factor.

5. Now that all changes have been made, press the Left arrow key until you are asked Go 

On-Line? Reply Yes by pressing the Right arrow key. To display flow measurement, 

press the Right arrow key once more.

! CAUTION

If you change the upper range value or engineering units in the Transducer Block with 

the local display pushbuttons without making a corresponding change in the 

corresponding Analog Input Blocks from a fieldbus host, a mismatch error occurs and 

the Analog Input Block reverts to Out of Service mode.

Determining the Meter Factor

First find the “Cal Factor” or “IMT25 Cal Fact” on the flowtube data label.

If the flowtube data label has a “IMT25 Cal Fact.” listing, use that value as the “Meter Factor.”

If only a “Cal Factor” value is found on the flowtube data label, that value must be multiplied by 

the appropriate factor from Table 2 to calculate the “Meter Factor.”

Operation from Keypad/Display Panel

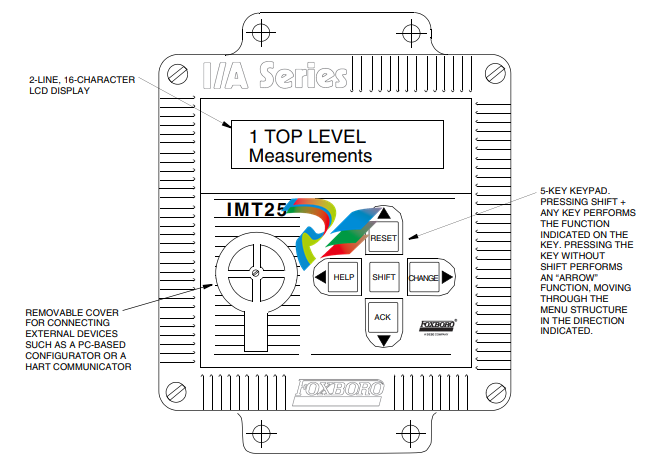
For local operation, configuration, and calibration, all operator entries are made through a 

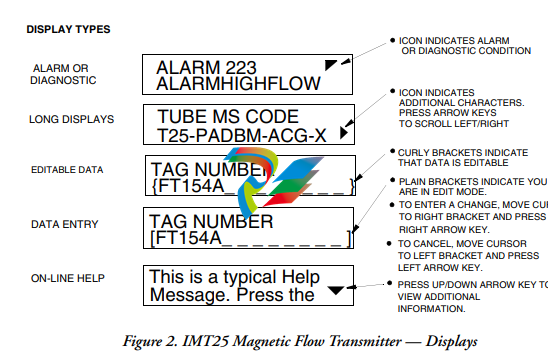
5-button keypad and all data is presented on a 2-line x 16 character LCD display. The 

keypad/display of the IMT25 Transmitter is shown in Figure 1. Information on various types of 

display is shown in Figure . 

Figure 1. IMT25 Magnetic Flow Transmitter — Keypad/Display

All required functions are accomplished by using the four arrow keys alone and in combination 

with the Shift key. Table 4 explains the function of each key

Top Level Menu

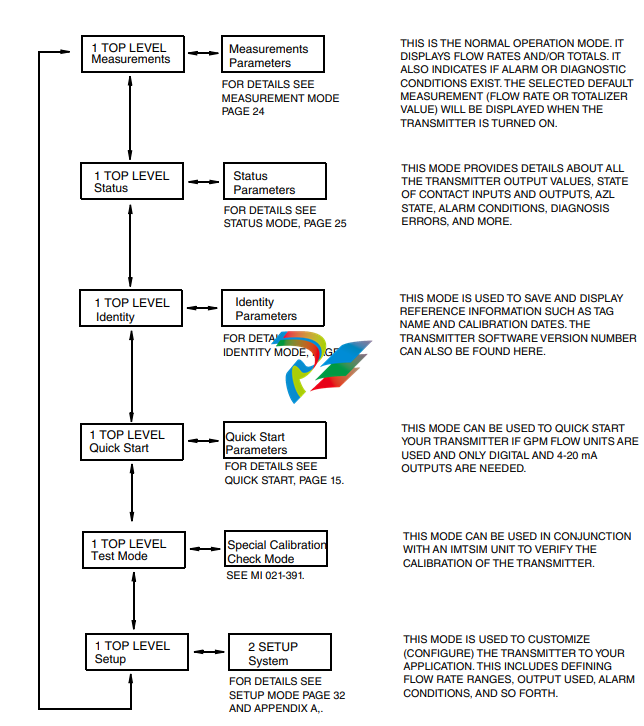
The Top Level menu displays the following modes – Measurements, Status, Identity, Quick Start 

(in FoxCom and HART transmitters), Test Mode, and Setup. You can switch from one to another 

in sequence by using the Up/Down arrow keys. To enter the second level menu from a particular 

top level screen, press the Right arrow key. To return to the top level from a second level menu 

item, press the Left arrow key. The level of the first, second, third, and fourth level menus is 

indicated by the digit appearing as the first character in Line 1 of the display; a 1 indicates Level 1 

(Top Level), a 2 indicates Level 2, and a 3 indicates Level 3, etc.

The top level menu is shown in Figure 3. For a complete presentation of all menu structures, refer 

to Appendix A.

Measurements Mode

The Measurements mode, which is your main operating mode, is displayed upon startup. 

Depending on the transmitter configuration, it has up to seven displays, any of which may be set 

as the startup default. All screens can be scrolled with the Up/Down arrow keys.

 Rate (EGU) — Shows current flow rate (forward or reverse) in the selected 

engineering units. 

 Rate (% Range) — Shows current flow rate (forward or reverse) as a percentage of full 

scale URV.

 Fwd Tot — Shows current value of the forward totalized flow in engineering units. 

Use the Net Tot display to reset.

 Rev Tot — Shows current value of the reverse totalized flow in engineering units. Use 

the Net Tot display to reset.

 Net Tot — Shows current value of the net totalized flow (forward total – reverse total) 

in selected engineering units. Press Shift + Reset to reset the displayed total to 

zero. Resetting Net Tot also resets Fwd Tot and Rev Tot. It does not reset Gr Tot. 

If Reset Totals is passcode protected, the message Enter Passcode appears.

 Grand Tot — Shows current value of the grand total flow in engineering units. Press 

Shift + Reset to reset the displayed total to zero. Resetting Gr Tot does not reset 

Fwd Tot, Rev Tot, and Net Tot. If Reset Totals is passcode protected, the message 

Enter Passcode appears.

If the Dual Display feature is configured On, a combination of two of these parameters can be 

displayed at once. A typical dual display, in which Line 1 shows flow rate and Line 2 shows the 

present forward total, is shown below. Units may not be displayed or may be truncated. 

You may step through the displays of each of these parameters with the Up and Down arrow keys. 

However, unless you specifically do so, the display defaults to that configured in Setup mode. The 

engineering units and formats used in the displays are also configured in Setup mode.

Status Mode

The Status mode enables you to view fourteen system parameters and thus assess the performance 

of the loop. You may not edit them in this mode. To step through the displays of the following 

parameters, use the up/down arrow keys: 

 Mode — Shows the present operating mode: On-Line, Off-Line, Override, or 

Calibrate. This will normally display On-Line. The other modes will only be 

displayed if someone else has changed the mode with an I/A Series Workstation,

PC-Based Configurator, HART Communicator, or fieldbus host. Off-Line means

that it has been taken off-line; Override, that the measurements cannot be relied 

upon because one or more of the outputs is at a preset value; and Calibrate, that the 

transmitter is in Calibration mode.

 Alarm — Shows the most current active alarm. If there are no active alarms but 

something is in the history buffer, the display reads Alarms In Buffer. If there are 

no active alarms and nothing in the buffer, display reads No Alarms. 

 Diagnostics — Shows No Diag, Diag Existed, or Diag Exists. If a diagnostic 

problem exists, the second line identifies the problem. Help is available with the 

Shift + Help keys. An active diagnostic problem cannot be cleared; the problem 

must be corrected. Diag Existed means a diagnostic error did occur, but the 

condition has cleared and the transmitter is working correctly. However, the Diag icon 

will remain on the display until the diagnostic has been acknowledged. To clear, the 

transmitter must be in the Status mode with the diag window displayed. Then use the 

Shift + Ack keys.

 Digital Output — If the transmitter output is in Digital Output mode, the display 

shows whether the transmitter is configured for Unidirectional or BiDirectional flow. 

If the transmitter is not in Digital Output mode, the screen is not displayed.

NOTE

Digital and Analog Output are mutually exclusive. Only one of the two are displayed 

at any one time.

 Analog Output — If the transmitter output is in Analog Output mode, the display 

shows whether the transmitter is configured for U (unidirectional), U/M1

(unidirectional multirange-range 1), U/M2 (unidirectional multirange-range 2, U/M3

(unidirectional multirange-range 3), B/D (bidirectional dual range), or B/S

(bidirectional split range). If the transmitter is not in Analog Output mode, the screen 

is not displayed.

NOTE

Digital and Analog Output are mutually exclusive. Only one of the two are displayed 

at any one time.

Table 5. Analog Output Configuration

Display Interpretation

U UniDirectional Flow Single Range

U/M1 UniDirectional Flow Multi-Range

Range 1 Active

U/M2 UniDirectional Flow Multi-Range

Range 2 Active

U/M3 UniDirectional Flow Multi-Range

Range 3 Active

B/D BiDirectional Flow Dual Range

B/S BiDirectional Flow Split Range

(mA reading less than 12 indicates reverse flow, greater than 12, 

positive flow)

**UNKNOWN** Multi-Range is configured, but both contact inputs used to select 

the active range are in inactive state

 AZL Detect (Empty Pipe Det) — The intent of the AutoZeroLock Detection 

(Empty Pipe Detection) feature is explained in “AutoZeroLock (Empty Pipe)” on 

page 53. 

If the AutoZeroLock (Empty Pipe) detector is configured On, the display shows:

EPD Inactive, EPD Active, or EPD Needs Setpnt (FoxCom)

AZL Inactive, AZL Active, or AZL Needs Setpnt (HART)

Inactive, Active, or AZL Needs Cal (Fieldbus).

When AZL (EPD) is active, the outputs are locked at zero. If AZL (EPD) is 

configured Off, the status display shows Off.

! WARNING

Do not take any action that can cause danger to personnel or damage to equipment 

based on the assumption that a pipe is empty or full because of an AutoZeroLock 

(Empty Pipe Detection) indication.

 AZL Count (Empty Pipe Cnt) — Shows the cumulative count (maximum of 255) of 

AZL (empty pipe) conditions that have occurred since the last reset. To reset the 

count to zero, press Shift + Reset Note that in some cases several counts may 

occur for one emptying of the pipeline.

 Noise Reduction — Shows whether the noise reduction function is configured On or 

Off.

Write Protection — Shows whether the Write Protection dip switch is in the On position so that 

no Setup (configuration) changes may be made. This feature is usually only used in custody 

transfer applications or for another reason that you want to assure that the configuration is not 

changed. For the procedure to change the setting of this switch, see MI 021-387.

SHINKAWAVM-5 SERIES MONITOR MODEL VM-5K DUAL VIBRATION MONITOR INSTRUCTION MANUAL

7-2 BASIC KEY OPERATIONS 

• (SET) key : Used to change the display mode of the LCD display and to 

finalize input. 

• (UP) key : Used to change parameters and increment set values. 

• (DOWN) key : Used to change parameters and decrement set values. 

• (RESET) key : Used to reset alarms set to self-holding. 

• Alarm reset is not possible until the output condition has been released. 

• An alarm lamp set flashing by the First-out Display function cannot be reset. 

(Reset by shorting between the RES and COM terminals.) 

• (CHECK) key : The CHECK key is used to adjust the gain while changing set 

values with the UP and DOWN keys. 

For example, if the CHECK key is pressed while the value 0.1 

appears on the MEAS 2 LED display, a value corresponding to the 

measurement range × 0.1 can be set. 

• Each operation of the CHECK key will multiply the multiplier by 10. 

 : When the CHECK key is pressed during normal monitoring, the 

monitor will go through self-diagnosis in the following sequence : 

(1) LCD, LED display test (all lamps light) 

(2) Self-diagnosis 

(3) Display of diagnosis result (Normal) (Abnormal) 

• The diagnosis result for CH1 is indicated on the MEAS 1 display and that for CH2 on 

the MEAS 2 display. 

• If an abnormality is found as a result of self-diagnosis, the error content is displayed 

after approx. 3 seconds. 

• In case of more than one abnormality, error contents are displayed at 3-second 

intervals. 

 Error content display 

Check items Display 

CH1 OK (input abnormal) alarm HIGH 

CH2 OK (input abnormal) alarm HIGH 

CH1 OK(input abnormal) alarm LOW 

CH2 OK(input abnormal) alarm LOW 

CH1 A/D input 5V side over 

CH2 A/D input 5V side over 

CH1 A/D input 0V side over 

CH2 A/D input 0V side over 

For safe operation….. 

Thank you for using our VM-5 Series Monitor. SHINKAWA Sensor Technology applies strict quality control 

and inspections to ensure the high reliability of its products. 

This instruction manual contains descriptive information, specifications, and operating, setting, and adjusting 

procedures. 

Please study the contents of this manual and related manuals thoroughly before installing or operating the 

equipment, and keep it handy for future reference. 

“Safety Conventions” 

Please thoroughly study the following section entitled “Safety Conventions” before operating the 

equipment. 

The safety symbols explained in this section are placed outside the left margin next to the text to which they 

apply. 

This unit is designed for use by specialists or persons thoroughly familiar with the field. 

Make sure that the end user receives the Instruction Manual delivered with this unit. 

Before use….. 

When the unit is received, inspect it for damage suffered in transport and check 

whether it is the item you ordered. In the unlikely event that it was damaged in transport 

or does not function according to specifications, please contact the SHINKAWA Office 

or dealer nearest you. 

Store the unit under the ambient conditions given in the specification. 

Avoid places where it is exposed to high humidity or corrosive gases. 

Make it a rule to follow the instructions given in this manual. 

This manual contains important information designed to prevent personal injury and property damage, and 

ensure safe operation of the equipment. 

Familiarize yourself with the signs and symbols explained below before proceeding to read the manual, and 

observe the instructions given. 

■ Explanation of signs

Symbols Explanation 

 WARNING Indicates a potentially hazardous situation which, if not avoided, could result in death 

or serious injury. 

 CAUTION Indicates a potentially hazardous situation which, if not avoided, may result in minor 

or moderate injury. It may also be used to permit for property-damage-only accidents. 

◊ “Serious injury” refers to such injuries as loss of eyesight, injuries, burns (due to heat or cold), electric 

shock, fractures, and poisoning, that have permanent aftereffects and require hospitalization or long-term 

outpatient treatment. 

◊ “Moderate or minor injury” refers to such injuries as burns and electric shock that do not require 

hospitalization or long-term outpatient treatment. “Property-damage-only accidents” refers to 

consequential damage related to destruction of property and damage to the equipment. 

■ Explanation of symbols

Symbols Explanation 

 Indicates a prohibited action.

Details are given in the text next to the symbol. 

 Indicates a mandatory action.

Details are given in the text next to the symbol. 

To ensure safe use of this equipment, strictly observe the safety precautions provided in this manual, as well 

as installation methods and methods of use stipulated by laws and regulations. SHINKAWA Sensor 

Technology will not be liable for damage, etc. due to methods of use contravening to the instructions provided 

here. 

■ Safe use 

WARNING

Make sure to ground. 

May cause electric shock or malfunction.

Make sure to turn the power off before any wiring work.

Will cause electric shock. 

CAUTION

Connect the input signal within the voltage range described in the 

specification to the input terminals. 

Will cause damage and malfunction of the instrument. 

Install the monitor unit and its relay module unit in the same location in the 

instrument rack. 

Will cause damage to the instrument and malfunction of the turbine monitoring system. 

A printed circuit board and electronic products may receive damage with 

the static electricity of a human body. 

Touch the metal part once and discharge your static electricity before 

dealing with it. 

Will cause damage and malfunction of the instrument. 

Do not touch parts and soldered surfaces of the monitor unit. 

Will cause damage and malfunction of the instrument. 

The monitor unit is a precision instrument. 

Take care not to expose it to excessive shock or vibration. 

Do not change the parameter settings during operation. 

May cause unexpected alarm output. 

Do not pull out the face plate during operation. 

Will cause damage to the instrument and malfunction of the turbine monitoring system. 

Do not measure insulation resistance and dielectric strength other than 

those at places specified. 

Will cause damage to the instrument. 

Do not remodel this monitor unit without permission. 

Otherwise the guarantee can not be made.

■ EMC(Electro-magnetic compatibility) 

The EMC of each VM-5 Series monitor is evaluated by various noise tests. 

However, its characteristics may vary with on environmental conditions such as the magnitude of noise, 

ambient temperature, humidity and the arrangement of equipment. 

For the above reason, when operating the monitor, please observe the following CAUTION. 

 CAUTION

The monitor unit should be operated by specialists or personnel who have 

knowledge of it. 

When a shielded cable is used, the length of the unshielded cable section 

should be less than 100mm (3.937in REF.). 

For each relay used near this monitor unit, devices related to this monitor 

unit or signal cables connecting the monitor unit and these devices, install 

a surge killer.

Firmly tighten each screw used for mounting each unit. In additional, 

always close the face plate for the monitor unit, then fix it with knurled 

screws. 

In order to prevent the system from its malfunction when the monitor unit 

fails, provide the systematic interlock function.

Do not wire input signal cables in parallel with control and power cables. 

It is recommended that separated wire ducts be used for these cables.

Do not use any radio equipment near the monitor unit. 

■ Noise filter 

Noise transmitted through in each cable may be rejected to some extent by inserting a ferrite core in the cable 

(note 1). 

If the cable passes through noisy surroundings, it is recommended that such a noise prevention device is used.

GENERAL INFORMATION 

OVERVIEW 

This is a highly reliable dual channel vibration monitor which monitors the shaft vibration of 

rotating machinery. 

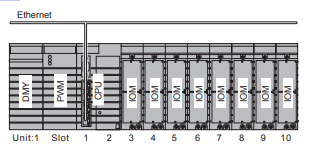
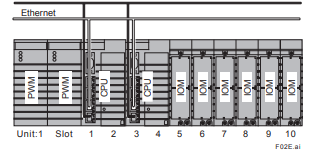
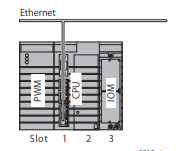
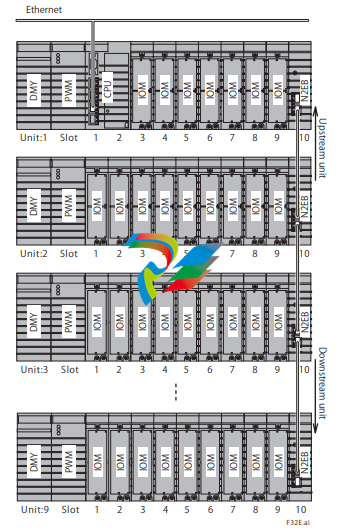
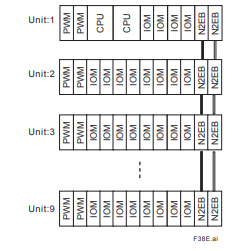
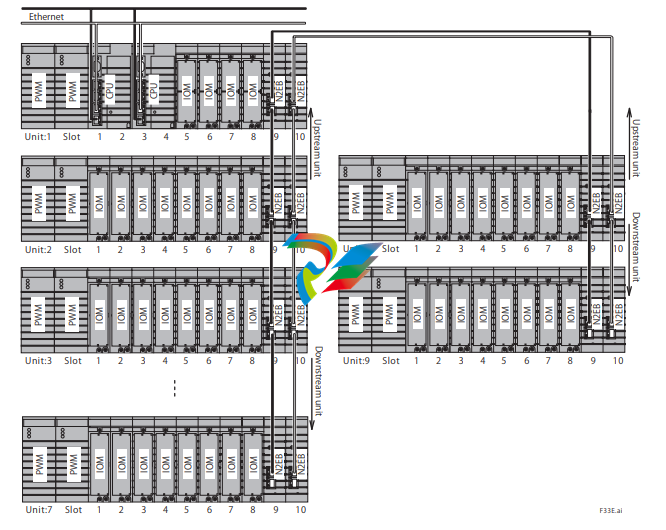
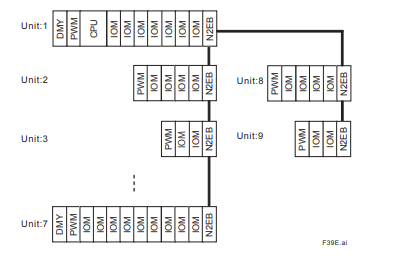
Both a 10-slot rack mounting type and a single-unit independent type with a built-in power supply 

are available so that it can respond flexibly to any system design from medium and small scale 

rotating machinery to TSI. The monitor accepts signals detected by a transducer and displays them 

on LCD. 

It is also possible to set ALERT and DANGER alarm levels independently to detect machine 

failures early on and inform the operator of these failures. It has a built-in self-diagnostic function 

to inform the operator of input transducer failures, thereby preventing rotating machinery from 

false shutdowns. 

FEATURES 

• Conforms to API St’d 670 

• The monitor is available as a single unit independent type or a rack mounting type. 

• Has a self-diagnostic function. 

• Allows the operator to change each setting even in the field. 

• Important information such as measured value, alarm set value and gap voltage is normally 

displayed. 

• Can isolate recorder output (option). 

• LED display / contact output (DANGER / ALERT alarm). 

• LED display / contact output (Input abnormal alarm). 

• For alarm output wiring proceed as described in the instruction manuals for the 

VM-5G Single Unit Instrument Rack and VM-5Y Relay Module Unit used in 

combination with this monitor unit. 

• If megger test is made on the signal cable between transducer and monitor, 

disconnect the cable from transducer and monitor. 

Be sure to discharge the charged electric load before connecting the cable to the 

transducer and monitor. 

If this caution is not adhered to, the transducer and monitor could be damaged. 

FIRSTOUT DISPLAY 

• Installation in VM-5H3, 5W1 Instrument Rack 

Causes the alarm lamp of the channel that first output alarm to flash. 

• Installation in VM-5G Single Unit Instrument Rack 

Causes the lamp of the alarm first output to flash.

For details refer to 7. PARAMETER SETTING on page 19. 

• An alarm lamp set flashing by the First-out Display function cannot be reset by 

pressing the RES (RESET) key. 

Reset by shorting between the RES and COM terminals. 

• It is necessary to keep short circuit of the terminals for more than one (1) second to 

operate these functions. 

5-9 SEQUENCE FUNCTION 

To prevent alarm output due to excessive vibration generated during starting and stopping of the 

machine, this function expands the DANGER alarm and ALERT alarm set ranges by shorting 

between the SEQ. and COM terminals. 

• The machine is not protected if the alarm set value exceeds 110% of the monitor 

range due to operation of the sequence circuit. 

• It is necessary to keep short circuit of the terminals for more than one (1) second to 

operate these functions. 

5-10 BYPASS FUNCTION 

Used to disable alarm output while setting the alarm parameters, or during maintenance/inspection 

work. The alarm BYPASS lamp flashes or lights during this operation. Set by turning the BYPASS 

switch to ON. 

• While BYPASS FUNCTION is in operation, the machine is not protected. 

5-10-1 DANGER BYPASS 

Cuts off DANGER alarm. While cut off, the DANGER alarm and BYPASS lamps are flashing. 

This function is activated by means of the DANGER BYPASS switch. For details refer to 7. 

PARAMETER SETTING on page 19. 

• If mounted in the VM-5H3 or VM-5W1 Instrument Rack, all units in the instrument 

rack can be set collectively to DANGER BYPASS. 

For details refer to VM-5H3 or VM-5W1 Instrument Rack instruction manual. 

5-10-2 CH1 BYPASS 

DANGER alarm, ALERT alarm, OK alarm, display and recorder output of CH1 are cut off. 

While cut off, the OK lamp goes off and the BYPASS lamp lights. 

This function can be activated by means of the CH1 BYPASS switch. 

For details refer to 7. PARAMETER SETTING on page 19. 

5-10-3 CH2 BYPASS 

DANGER alarm, ALERT alarm, OK alarm, display and recorder output of CH2 are cut off. 

While cut off, the OK lamp goes off and the BYPASS lamp lights. 

This function can be activated by means of the CH2 BYPASS switch. 

For details refer to 7. PARAMETER SETTING on page 19. 

5-11 POWER ON TIMER MODE 

Operates for approx. 5sec. after the power is turned on. (for approx. 25 sec. in case of pk-pk 

detection). In this mode, all alarm functions are disabled and the BYPASS and OK lamps flash. 

5-12 ALARM RELAY MODE 

Each alarm contact can be set to either normally de-energized or normally energized. 

Alarm contact operation 

Monitor power Monitor power ON 

OFF Normal state Alarm state 

NO contact NORMALLY DE-ENERGIZED OPEN OPEN CLOSE 

NO contact NORMALLY ENERGIZED OPEN CLOSE OPEN 

NC contact NORMALLY DE-ENERGIZED CLOSE CLOSE OPEN 

NC contact NORMALLY ENERGIZED CLOSE OPEN CLOSE 

For details refer to 7. PARAMETER SETTING on page 19.

5-13 ALARM RESET MODE 

The automatic reset of all alarm output and alarm lamps can be set when the measured value or 

input signal return to normal. In addition to above, the self-holding function can be also set for 

each alarm output that holds the alarm condition until reset by setting RES key (inside of the front 

panel) or by shorting between RES and COM terminal. 

• Alarm reset is not possible until the output condition has been released. 

• It is necessary to keep short circuit of the terminals for more than one (1) second to 

operate these functions. 

For details refer to 7. PARAMETER SETTING on page 19.

5-14 MONITOR OUTPUT 

For vibration analysis, the vibration waveform signal is output from the BNC connector on the 

monitor front panel and buffer output terminal on the rear panel (VM-5G Single Unit Instrument 

Rack, VM-5Y Relay Module Unit) via a buffer amplifier. 

5-15 RECORDER OUTPUT 

An analog signal proportional to the vibration value is output from the terminal block. 

5-16 SELF-DIAGNOSTIC FUNCTION 

Any failures in the input system, such as sensor short-circuit or imperfect connections, are detected, 

then an OK alarm is contact-output and (simultaneously), the OK lamp flashes. 

5-17 POWER SEQUENCE 

If mounted in the VM-5G Single Unit Instrument Rack, the secondary power supply can be cut off 

by shorting between the P-S (POWER SEQUENCE) and COM terminals. 

• This function can be used for pulling out or pulling in the monitor unit at the 

emergency time. However, do not use for long time shorting of more than one (1) 

minute or turning on and off repeatedly. 

Also, the parallel connection for the two (2) or more monitors should not be allowed. 

5-18 TIMED OK CHANNEL DEFEAT 

When on setting, when OK alarm is output, DANGER alarm, ALERT alarm, display, and recorder 

output are disabled. DANGER ALERT, display and recorder output are not disabled, in case of 

excessive signal input from sensor. 

For details refer to 7. PARAMETER SETTING on page 19. 

5-19 SUPPRESSION FUNCTION 

This function can suppress the measurement around zero measurement point of the monitor by the 

effect of the piping vibration or electric noise, etc. during the machine stopping. 

The suppression can be set at 0.0 to 10.0 % (0.1% step) of the monitor range. 

ex.) If the suppression is set at 2.0%, monitor measurement less than 2.0% shall be output as 0.0%

2 DESCRIPTION OF PARTS 1 LCD display This LCD display serves for display of measured values, alarm set values, sensor set gap voltage value and other set values. 2 DANGER alarm lamp Lit when DANGER alarm is output. 3 ALERT alarm lamp Lit when ALERT alarm is output. 4 OK lamp Flashes (steady light in normal condition) when OK (input abnormal) alarm is output. 5 BYPASS lamp Flashes during DANGER bypass and lights during CHANNEL bypass. 6 Monitor output connector This is a BNC output connector for connection of an oscilloscope to observe the waveform, or for output to other devices such as an analyzer. The input signals from the transducers are output through a buffer amplifier. • Make sure to insulate the monitor output against earth. If not insulated, a 2-point earth system results, which may cause noise interference. 7 Name plate 8 Tag, Ser. No. plate The TAG NO. and SER.NO. are entered on this plate. 9 LCD board 10 Slide frame 11 Main board frame 12 Main board 13 DIN connector (64pin) Connector for connection to the VM-5G Single Unit Instrument Rack or VM-5H3 or VM-5W1 Instrument Rack.

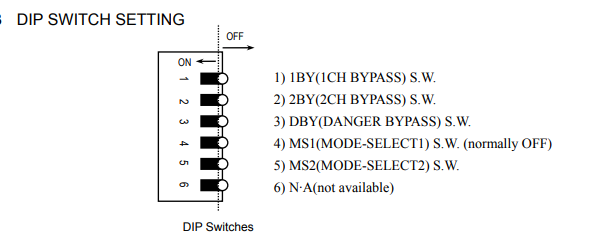
1) 1BY (CH1 BYPASS) Switch 

“ON” To select CH1 BYPASS function. 

“OFF” Normal monitoring 

2) 2BY (CH2 BYPASS) Switch 

“ON” To select CH2 BYPASS function. 

“OFF” Normal monitoring 

3) DBY (DANGER BYPASS) Switch 

“ON” To select DANGER BYPASS function. 

“OFF” Normal monitoring 

4) MS1 (MODE-SELECT1) Switch (normally OFF) 

• Set normally to “OFF”. Parameter setting mode is disabled. 

5) MS2 (MODE-SELECT2) Switch 

“ON” 

For setting the alarm reset mode, alarm delay time, alarm relay mode, first-out display, 

and timed OK channel defeat. 

Also enables setting the address when used in combination with the VM-5H3 or 5W1 

Instrument Rack and VM-5P1,2 Communication/Phase Marker Unit or VM-53 Dual 

Communication Unit. To PARAMETER SETTING 1. 

“OFF” 

For changing the set values for DANGER alarm and ALERT alarm, and GAP ALARM, 

and adjusting measured value and recorder output zero span. 

To PARAMETER SETTING 2.

STOBERDESCRIZIONE Il regolatore indicatore Serie SG65 è adatto al controllo di variabili fisiche quali temperatura, pressione e livello di liquidi, gas e vapori negli impianti industriali o di processo. Il valore misurato della variabile fisica viene

This manual contains information which must be adhered to in order to prevent personal 

injury and property damage. This information is graduated by degree of damage as 

shown below. 

ATTENTION 

Means that an undesired result or undesired state may occur if this note is not heeded.

CAUTION 

Without warning triangle: Means that property damage may occur if appropriate 

precautions are not taken. 

CAUTION 

With warning triangle: Means that minor personal injury and property damage may occur 

if appropriate precautions are not taken. 

WARNING 

Means that major danger of death and substantial property damage may occur if 

appropriate precautions are not taken. 

DANGER 

Means that great danger to life and substantial property damage will occur if appropriate 

precautions are not taken. 

NOTE 

Indicates an important piece of information on the product or the drawing of attention to a 

part of the documentation requiring special attention. 

ACTION 

Means the description of an action which is particularly important for handling the 

product.

WARNING 

To ensure that avoidable problems do not occur during commissioning and/or operation, 

be sure to read these installation and commissioning instructions before installation and 

commissioning. 

In the sense of DIN EN 50178 (formerly VDE 0160), the FDS and MDS model series of 

POSIDRIVE®

 are electrical components of power electronics for the regulation of energy 

flow in high-voltage systems. They are exclusively designed to power servo (MDS) and 

asynchronous (FDS, MDS) machines. Utilization, installation, operation and maintenance 

are only permitted under observation and adherence to valid regulations and/or legal 

requirements, applicable standards and this technical documentation. 

This is a product of the restricted sales class in accordance with IEC 61800-3. In a 

residential zone, this product may cause high-frequency interference in which case the 

user may be requested to take suitable measures. 

 Strict adherence to all rules and regulations must be ensured by the user. 

The safety notes contained in further sections (items) and specifications must be 

adhered to by the user. 

WARNING 

Caution! High touch voltage! Danger of shock! Danger to life! 

When network voltage is applied, never under any circumstances open the housing or 

disconnect the connections. When installing or removing option boards, you may only 

open the inverter in the dead state (all power plugs disconnected) and only after a 

waiting period of at least 5 minutes after the network voltage is switched off. Prerequisite 

for the correct functioning of the inverter is the correct configuration and installation of 

the inverter drive. Transport, installation, commissioning and handling of the device may 

only be performed by qualified personnel who have been especially trained for these 

tasks. 

Pay particular attention to the following: 

• Permissible protection class: Protective ground. Operation is only permitted when the 

protective conductor is connected in accordance with regulations. Direct operation of 

the devices on IT networks is not possible. 

• Installation work may only be performed in the dead state. For work on the drive, lock 

enable and disconnect the complete drive from the power. (Observe the 5 safety 

rules.) 

• Leave the plug for the DC link coupling connected even when the DC link coupling is 

not being used (BG0-BG2: X22)! 

• Discharge time of the DC link capacitors > 5 minutes. 

• Do not penetrate the device’s interior with any kind of object. 

• During installation or any other work in the switching cabinet, protect the device 

against falling parts (pieces of wire, stranded wire, pieces of metal, and so on). Parts 

with conductive properties may cause a short circuit within the inverter or device 

failure. 

• Before commissioning, remove extra coverings so that the device cannot overheat. 

The inverter must be installed in a switching cabinet in which the maximum ambient 

temperature (see technical data) is not exceeded. Only copper lines may be used. The 

line cross sections to be used are contained in table 310-16 of the NEC standard at 

60 o

C or 75 o

C. 

The company STÖBER ANTRIEBSTECHNIK GmbH + Co. KG accepts no liability for 

damages resulting from non-adherence to the instructions or the particular 

regulations. 

The motor must have an integral temperature monitor with basis insulation as per 

EN 61800-5-1 or external motor overload protection must be used. 

Only suitable for use on supply current networks which cannot deliver more than a 

maximum symmetric, nominal, short-circuit current of 5000 A at 480 Volt. 

Integral solid state short circuit protection does not provide branch circuit protection. 

Branch circuit protection must be provided in accordance with the Manufacturer 

Instructions, National Electrical Code and any additional local codes”, or the equivalent. 

Suitable for use on a circuit capable of delivering not more than 10 kA rms. Symmetrical 

Amperes, 480 Volts Maximum” when Protected by RK1 Class Fuses as specified in the 

chapter technical data. 

 Subject to technical changes without prior notification which changes serve to 

improve the devices. This documentation is purely a product description. It does 

not represent promised properties in the sense of warranty law. 

1.2 Software 

Use of the POSITool software The POSITool software package can be used to select an application, adjust parameters 

and signal monitoring of the 5th generation of STÖBER inverters. The functionality is 

specified by the selection of an application and the transmission of these data to an 

inverter. 

The program is the property of STÖBER ANTRIEBSTECHNIK GmbH + Co. KG and is 

protected by copyright. The program is licensed for the user. 

The software is provided exclusively in machine-readable format. 

The customer receives from STÖBER ANTRIEBSTECHNIK GmbH + Co. KG a nonexclusive right to use the program (license) if the program was obtained legally. 

The customer has the right to utilize the program for the above stated activities and 

functions and to make and install copies of the program, including one backup copy, for 

support of said utilization. 

The conditions of this license apply to all copies. The customer is obligated to place the 

copyright note and all other ownership notes on every copy of the program. 

The customer is not authorized to use, copy, change or pass on/transmit the program for 

reasons other than those covered by these conditions; the customer is also not 

authorized to convert the program (reverse assembly, reverse compilation) or compile 

the program in any other manner, or to sublicense, rent or lease the program. 

Product maintenance The obligation to perform maintenance applies to the two last current program versions 

prepared and released for use by STÖBER ANTRIEBSTECHNIK GmbH + Co. KG. 

STÖBER ANTRIEBSTECHNIK GmbH + Co. KG can either correct program errors or 

provide a new program version. The choice is up to STÖBER ANTRIEBSTECHNIK 

GmbH + Co. KG. If, in individual cases, the error cannot be corrected immediately, 

STÖBER ANTRIEBSTECHNIK GmbH + Co. KG will provide an intermediate solution 

which, if necessary, requires adherence by the user to special operating regulations. 

The claim to error correction only exists when reported errors are reproducible or can be 

recorded by machine-made outputs. Errors must be reported in reconstructable form 

giving useful information for error correction. 

The obligation to correct errors is invalidated for such programs which the customer 

changes or manipulates unless the customer can prove when reporting the error that the 

manipulation is not the cause of the error. 

STÖBER ANTRIEBSTECHNIK GmbH + Co. KG is obligated to keep the currently valid 

program versions in a specially protected place (fire-resistant data safe, safety deposit 

box at a bank). 

3.2.2 With Bottom Brake Resistor 

Available for BG 0 to BG 2.

The “brake resistor RB 5000” substructure is the ideal solution when space is 

limited. It is placed between mounting surface and MDS 5000. This increases 

the mounting depth by approx. 20 mm. 

Mounting 

• Secure the bottom brake resistor (A) on the mounting surface 

with the included threaded bolts and spring rings (same drilling 

diagram as MDS 5000) (B). 

• Hook the MDS 5000 in on the four guides (C). 

• Secure the MDS 5000 to the threaded bolts with the two 

included screws (D). 

3.2.3 EMC Shield Plate and Brake Module for 24 V Brake 

The EMC shield plate (EM 5000) and the brake module for 24 V brake 

(BRM 5000) are physically identical units (cf. accessories, chap. 7.1). 

If necessary, the EMC shield plate can be replaced by the 

brake module for 24 V brake. See also chap. 4.4. 

BG 0 – BG 2 

• Position the EMC shield plate at a slight angle and insert the 

two brackets in the provided openings (B). 

• Hook in the EMC shield plate. 

• Secure the device and the EMC shield plate with the 

mounting screw (C). 

• If already installed, secure the motor cable with the EMC 

clamp (A). 

• Check to make sure that the shield of motor cable is 

positioned flat on the EMC shield plate with the EMC clamp. 

See also chap. 4.7. 

BG 3 

• Unscrew the screw (D) on the lower portion of the housing front. 

• Place the brake module for 24 V brake with the two tabs in the two cutouts (E) 

in the housing front. 

• Secure the brake module for 24 V brake with the screw (D)

Installation of Accessories 

Only specialized personnel who are qualified for this task may install accessories (cf. chap. 7). Suitable measures must be 

provided against damage by electrostatic discharging (in accordance with DIN EN 50082-2). Before installation, the device must 

be disconnected from the power and, with the MDS 5xxx/L series, the 24 V power must be turned off. Remember the discharge 

times (≥ 5 min.) for the DC link. 

CAUTION 

Immediately after the power is turned off, the DC link is still charged. Wait > 5 min. for the DC link to discharge 

after turning off the power voltage. To prevent damage to device and accessory parts, install the accessory 

afterwards. 

CAUTION 

Danger of electrostatic charges damaging the PCB! 

Perform potential equalization before you touch a PCB (option module 1 and 2). 

3.3.1 Option module 1 (fieldbus) 

3.3.1.1 CANopen DS-301 (CAN5000) / PROFIBUS DP-V1 (DP5000) 

Installation is the same for both modules. 

• Make sure that the device is without power. Wait ≥ 5 min. for the DC link capacitors to discharge after turning off the power 

supply voltage. 

• Disconnect the cover plate by removing the two screws (E). 

• Remove the prepunched area (A) for the sub D plug connector on the plate. 

• Mount the plate on the board with the included UNC bolts (B). 

• Slide the fieldbus board (C) with the gold-contacted terminal surfaces (D) into the black terminal block. 

CAUTION 

Be sure not to touch the gold contact surface with your fingers (danger of fouling and corrosion). 

• Check correct position of the board. 

• Secure the board with the two included screws (E). 

• Then apply included labels (nameplate and adhesive label for switch setting (CAN)) to the cover plate. 

3.3.1.2 EtherCAT (ECS 5000) 

• Make sure that the device is without power. Wait ≥ 5 min. for the DC link capacitors to discharge after turning off the power 

supply voltage. 

• Disconnect the cover plate by removing the two screws (C). 

• Slide the EtherCAT board (A) with the gold-contacted terminal surfaces (B) into the black terminal block. 

CAUTION 

Be sure not to touch the gold contact surface with your fingers (danger of fouling and corrosion). 

• Check correct position of the board. 

• Secure the board with the two included screws (C). 

• Then apply included labels (nameplate) to the cover plate.

3.3.2 Option module 2 (terminals) 

• Standard (SEA 5000, SEA 5001) 

• Expanded (XEA 5001) 

• Resolver (REA 5000)

Installation is the same for all modules. 

• Make sure that the device is without power. 

• Before installation, remove the blue plastic cover (A) below the serial interface 

(terminal X3). 

• Make sure that the device is without power. 

• Unlock the snap-on lock (B) directly below terminal X3 and, on the snap-on 

lock, pull the cover towards the front. 

• To completely unhook the cover, pull this in the direction of the operator panel. 

• Push the I/O terminal module with the gold-contacted terminal surface (C) 

into the black terminal block (D). 

CAUTION 

Be sure not to touch the gold contact surface with your fingers 

(danger of fouling and corrosion). 

• Check correct position of the board. 

• Secure the board with the two included screws (E). 

• Now hook the plastic cover (A) with the two catches into the plastic housing. 

• Press the plastic cover (A) against the plastic housing until the snap-on lock 

(B) snaps in. 

POSIDRIVE® MDS 5000 – Mounting Instructions STÖBER ANTRIEBSTECHNIK 

4. Electrical Installation 

15

4 ELECTRICAL INSTALLATION 

This chapter gives you complete information on the subject of electrical installation. 

Only specialized personnel who are qualified for this task may install, commission and control the device. 

4.1 EMC 

This chapter contains general information on EMC-suitable installation. These are only recommendations. Depending on the 

application, the ambient conditions and the legal requirements, measures in addition to the following recommendations may be 

required. 

• Mount device or Bottom Brake Resistor on conductive surface (unpainted). 

• Install the power cables in spatially separately from the signal lines (encoder, analog/digital signal lines). 

• Use only shielded cable for motor lines (corresponding cabels can be ordered from STÖBER ANTRIEBSTECHNIK.). 

• Apply shield of the motor cable over a large surface in the immediate vicinity of the MDS 5000. The EMC shield plate (EM 

5000) for mounting on the bottom of the device is available as an accessory (see chap. 3.2.3 and chap. 7.1). 

• With asynchronous machines, apply the shield to the terminal block over a large surface (e.g. PG shield screw connection). 

• Use output deraters for motor lines > 50 m. 

• When an additional transfer plug connector is to be installed in the motor cable, the cable shield may not be interrupted. 

• When the brake line is installed in the motor cable, the brake line must be shielded separately. 

• When the length of the cable for connection of a brake resistor is longer than 30 cm, this must be shielded and the shield 

must be applied over a large surface in the immediate vicinity of the MDS 5000. 

• Connect the shield of the control lines on one side with reference ground of the reference value source (e.g., PLC or CNC). 

• Shield, and, if necessary, twist reference value lines before installing. 

4.2 RCD (Residual Current Protective Devices) 

Network phases and neutral conductors are connected with the protective conductor via Y capacitors. When network voltage is 

applied, a leakage current flows over these capacitors to the protective conductor. The greatest leakage current occurs during a 

malfunction (asymmetric feedin via only one phase) and during power-on (sudden change in voltage). The maximum leakage 

current due to asymmetric power feedin is 40 mA (network voltage of 400 V) for MDS inverters. 

If RCD circuit breakers are necessary, the problem of power-on and off can be alleviated by using selective RCD circuit 

breakers (switch-off delay) or RCD circuit breakers with increased tripping current (e.g., 300 or 500 mA). Only all-current 

sensitive RCD circuit breakers may be used. Operation of several devices on one RCD circuit breaker is not recommended. 

4.3 Power Connection 

Protection via line circuit breakers in accordance with the values listed in chap. 2 (tripping characteristic C, in accordance with 

EN 60 898) or suitable, delayed safety fuse. 

Use class RK1 fuses for UL conformance: Class RK1 (e.g., Bussmann KTS-R-xxA / 600 V)

POSIDRIVE® MDS 5000 – Mounting Instructions STÖBER ANTRIEBSTECHNIK 

4. Electrical Installation 

16 

4.4 Brake Module for 24 V Brake 

The relay in the basic device for brake control is equipped with hardgold contacts. This relay is designed for control of an 

electro-magnetic brake. The brake module for 24 V brake is required for control of a 24 V brake (BRM 5000). A thermally 

monitored and short-circuit-proof, electronic semi-conductor switch is available for switching the brake. When Brake module for 

24 V brake is placed between relay and brake, the integrated filter suppresses the switch-off reactions. This also increases the 

lifespan of the relay contacts. 

For a 230 VAC brake we also recommend control via 

a coupling relay and not directly via the existing relay. 

Installation 

• Connect terminal X302 with terminal X2 

(for connection cable, see chap. 4.7.2). 

• Connect the external 24 V to the power supply of the 

brake on X300 an (for pin allocation, see chap. 5.3). 

• The brake and thermal contact lines installed in the motor 

cable are connected to X301 (for pin allocation, see chap. 5.3). 

POSIDRIVE® MDS 5000 – Mounting Instructions STÖBER ANTRIEBSTECHNIK 

4. Electrical Installation 

17

4.5 DC Link Coupling 

If you are using axes in a plant which operate in a network of generators and motors, the DC link coupling (DC coupling) can be

advantageous. When the DC-coupling is used, the excess energy of other axes is made available as drive power instead of 

converting this excess power into heat with a brake resistor. Remember that you will need a brake resistor which can absorb the

power peaks when all drives in the DC-link network brake at the same time. 

DANGER 

Danger of damage to devices! When single-phase and three-phase devices are coupled, 

the single-phase devices will be destroyed. Use only three-phase devices for the DC link 

coupling!

CAUTION 

Danger of damage to devices! When one device within the DC-link coupling network fails, 

the complete DC-link coupling network must be disconnected from the power network since 

other devices in the DC-link coupling network may be damaged. Be sure to adhere to the 

wiring of the ready-for-operation relay shown in chapter 4.5.1 (X1.1 and X1.2). When a 

failure occurs, replace all devices of one group. 

NOTE 

Please note that the parameter A38 DC power-input must be set before the DC link 

coupling will function correctly. 

Group 1: A38 = 0: inactive

Group 2 and 3: A38 = 1: active

For more details, also see the description of the parameter. 

4.5.1 Basic Circuit Diagram 

The following diagram shows the basic circuiting of the DC-link coupling. The inverters can be coupled together in up to three 

groups. The table in chapter 4.5.2 shows the possible combinations. The combination determines the types of power fuse and 

DC-link fuse. 

MDS/FDS

5000

MDS/FDS

5000

MDS/FDS

5000

MDS/FDS

5000

MDS/FDS

5000

MDS/FDS

5000

MDS/FDS

5000

X10 X10 X10 X10 X10 X10 X10

X1 X1 X1 X1 X1 X1 X1

X221

X221

X22 X22 X22 1

X22 X22

RB RB U+ U+ U+ U+ U- U- U- U- U+ U+ U+ U- U- U11 1 1 22 2 2 111 222

L1

NOTE 

The certified version of the safety function is available for designs BG 0 to BG 2 as per EN 

954-1 category 3. You will find the certificate under www.stoeber.de 

The ASP 5001 may only be installed and repaired by STÖBER ANTRIEBSTECHNIK. This 

is why you should include installation in the inverter with your order of the ASP 5001. 

NOTE 

When certified use is required, the inverter must be installed in a switching cabinet with a 

protection rating of IP54. 

4.6.1 Description 

On the MDS 5000 inverter the safety function “safe torque off” can be implemented with option ASP 5001. When the safety 

function is used the inverter must be able to be switched off in two different ways. The first way to switch off the inverter uses 

the enable function. Diagnosis is performed via a binary output of the options SEA 5000, REA 5000, XEA 5001 or a fieldbus 

system. 

The second way to switch off the inverter uses the ASP 5001 option in addition. When the ASP 5001 option is activated, control 

of the end stage is switched off with the positively-driven switch elements of a safety relay. The reference value input is 

disabled, and the signal contact is switched to an external safety circuit (break contact). The motor cannot start up even when

there are defects in the end stage or the control circuit since the necessary phase sequence is no longer generated. 

Advantages of the ASP 5001 option:

• No switching of the network voltage necessary and the DC link remains charged. This permits a faster restart. 

• Less contact wear since only low voltage is switched. 

• Less additional wiring work. 

4.6.2 Use 

WARNING 

The starting lockout option only switches off the end stage. Dangerous voltages may still be 

present on the motor terminals! 

This means that the starting lockout option does not provide galvanic isolation from the 

power network. The function does not provide protection against “electrical shock.” 

During maintenance or repair work an appropriate voltage-free circuit and system protection 

are required. 

The regulations for emergency off situations must be adhered to. 

WARNING 

Since the safety function ensures that the motor torque is switched off, axes that are moving 

vertically must be protected against crashing down. 

WARNING 

Since the motor may run down in an undefined state when the starting lockout is activated 

during operation, it is essential to adhere to the switchoff sequences which will be described 

in the following section (1st and 2nd ways to switch off). 

TEWSThe Embedded I/O Company TPMC871 1 Socket PC Card Interface

TPMC871 1 Socket PC Card Interface

Application Information 

The TPMC871 is a standard single-width 32 bit PMC 

module with one interface for 16 bit PC Card or 32 bit 

Cardbus cards using a PC Card controller and a power 

management unit. The register map of the PC Card 

controller is Intel 82365-DF compatible. 

The power management unit provides 3.3V or 5.0V 

PC Card power supply and 3.3V, 5.0V or 12V PC Card 

programming voltage. Due to the short circuit and thermal 

protection of the power management unit no external 

fuses are needed on the module. 

The TPMC871 provides full ExCA register implementation 

of one 16 bit PC Card compatible with PCMCIA 2.1/JEIDA 

4.2 standards. Both memory and I/O cards are supported. 

Up to five memory windows and up to two I/O windows are 

available for PC Card 16 accesses. For 32 bit Cardbus 

cards two memory windows and two I/O windows are 

supported by the controller. Cardbus card status 

information can be accessed in five Cardbus socket 

registers which can be mapped in the host memory space. 

For First Time Users the Engineering Documentation 

TPMC871-ED is recommended. The Engineering 

Documentation includes TPMC871-DOC, schematics and 

data sheets. 

Software Support: 

o Software Support (TPMC871-SW-xx) for different 

operating systems is available. 

o The TPMC871 is directly supported from 

WindowsXP/2000 and Linux. 

Technical Information 

 Standard single-width 32 bit PMC module conforming 

to IEEE P1386.1 

 PCI 2.1 compliant interface 

 3.3V and 5V PCI Signaling Voltage 

 Board size: 149mm x 74mm 

 1 PC Card Slot with hot insertion and removal 

 Supports memory and I/O cards of type I and II 

Note: The PC Card assembly has a maximum 

component height of 5.6mm which is 0.9mm above the 

specified component height (4.7mm) according to 

IEEE1386.1 

Order Information 

RoHS Compliant 

TPMC871-10R 1 Socket PC Card Interface, PC 

Card accessible through front panel 

TPMC871-11R 1 Socket PC Card Interface, PC 

Card not accessible through front 

panel 

TPMC871-50R 1 Socket PC Card Interface, PC 

Card accessible through front panel, 

inserted PC Card behind front panel 

None RoHS Compliant 

TPMC871-10 None RoHS compliant version of 

TPMC871-10R

TPMC871-11 None RoHS compliant version of 

TPMC871-11R 

TPMC871-50 None RoHS compliant version of 

TPMC871-50R 

Documentation 

TPMC871-DOC User Manual 

TPMC871-ED Engineering Documentation, includes 

TPMC871-DOC 

Software 

TPMC871-SW-42 VxWorks Software Support 

(Legacy and VxBus-Enabled 

Software Support) 

For other operating systems please contact TEWS. 

Search for products

Back to Top
Product has been added to your cart